Get around Active Directory Paging on SSIS import

I have a client who is importing certain users from Active Directory.  The paging on their AD is set to 20,000 records.  When trying to pull data using a SQL statement, the query fails because it hits the maximum number of records and is unable to return more.   You could work around a problem like this by editing your query filter to ensure that you always retrieve fewer than 20,000 records at a time, for example using the whenCreated field.  However, there is no guarantee that whatever filter you use will always limit your return value to a maximum of 20,000 records.  And you now need to build a loop construct to retrieve all the records since you want more than 20,000 records.

This is much easier to solve than you might think, judging from the number of forum questions out there on the subject (and how long it took me to piece it together).   Here are the steps.

Create an SSIS package.

Add a string variable, scoped to the package, called SqlConn.  Populate it with the connection string to the database you want to populate with the AD records.

Add a script task to your package.  Open the script task, making sure that the ScriptLanguage is C# and not VB.

image

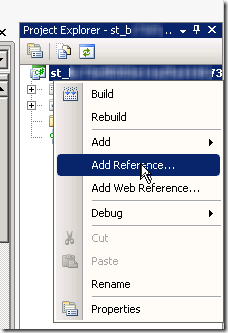
Click on the Edit Script button.  On the right hand side you should see the Project Explorer window.  Right click on the name of the Project File at the top of the tree and select Add Reference.

SNAGHTML6315ef17

On the .NET tab scroll down and find System.DirectoryServices. Select it and click OK.

image

Make sure you see the reference appear in the References folder in the Project Explorer window.

image

Add these statements at the beginning of your script.

using System.DirectoryServices;

using System.Data.SqlClient;

Paste this script to replace the public void Main().  Edit the ds.Filter and Insert string values to meet your table requirements.  Be sure to only select single value attributes of the object.   If you try to use this method to import multi-value attributes such as “Description” from AD it won’t work.  I’ll be writing about that next.

public void Main()

{

//Set up the AD connection;

using (DirectorySearcher ds = new DirectorySearcher())

{

//Edit the filter for your purposes;

ds.Filter = “(&(objectClass=user)(|(sAMAccountName=A*)(sAMAccountName=D0*)))”;

ds.SearchScope = SearchScope.Subtree;

ds.PageSize = 1000;

//This will page through the records 1000 at a time;

//Set up SQL Connection

string sSqlConn = Dts.Variables[“SqlConn”].Value.ToString();

SqlConnection sqlConnection1 = new SqlConnection(sSqlConn);

SqlCommand cmd = new SqlCommand();

SqlDataReader reader;

cmd.CommandType = CommandType.Text;

cmd.Connection = sqlConnection1;

//Read all records in AD that meet the search criteria into a Collection

using (SearchResultCollection src = ds.FindAll())

{

//For each record object in the Collection, insert a record into the SQL table

foreach (SearchResult results in src)

{

string sAMAccountName = results.Properties[“sAMAccountName”][0].ToString();

string objectCategory = results.Properties[“objectCategory”][0].ToString();

//Replace any single quotes in the string with two single quotes for sql INSERT statement

objectCategory = objectCategory.Replace(“‘”, “””);

sqlConnection1.Open();

cmd.CommandText = “INSERT INTO Users (sAMAccountName, objectCategory) VALUES (‘” + sAMAccountName + “‘,'” + objectCategory + “‘)”;

reader = cmd.ExecuteReader();

sqlConnection1.Close();

} } } }


That’s it.  This will iterate through all of the objects in Active Directory, regardless of paging size set on Active Directory.

To learn how to import multi-value fields from AD, read this post:

How to Query Multi-Value Fields from Active Directory using SSIS

Log not truncating on Checkpoint

I have a client who was running out of disk space due to a database log which was growing exponentially.  The database was set to Simple recovery, and the log was set to Truncate on Checkpoint.  The log was growing hugely and had to be manually shrunk every few days.

To find out the reason for the log not truncating I ran this query.

SELECT name,log_reuse_wait , log_reuse_wait_desc FROM sys.databases

I found out that the database was not truncating due to an Active Transaction. This can be caused by a long running transaction or by a deferred transaction.  http://technet.microsoft.com/en-us/library/ms345414(v=sql.105)

In the meantime the database went into Recovery mode and a number of things happened of which I am not aware.  Somehow the active transaction got cleared and the client manually shrunk the log file. 

We changed a few settings to minimize the damage should this happen again. The Autogrowth was set to 20% with no maximum.  We change the Autogrow settings to something more reasonable, with the initial size of 5GB, and a maximum of 10GB to at least protect the other files from getting stalled due to no space on the drive.

Then I looked at capturing the Active Transaction information.  Unfortunately, unless the Active Transaction was running, I was unable to find out what the transaction was.  I built a very simple SSIS package which I ran every 5 minutes to discover if an Active Transaction was holding up the log file, and to capture some information about what transaction was running and who was running it.

image

This package populated a new table in the data warehouse with the attributes of a transaction.  To avoid filling the table with information I didn’t need, I wrote the query so it would only populate the table if there were any transactions holding the log open.  Here is the source query for the Data Flow.  Should the IF EXISTS be negative, the Data Flow task would fail causing the Send Mail Task not to be triggered.

IF EXISTS

–IF log is held up due to Active Transaction
(SELECT  name, database_ID, log_reuse_wait , log_reuse_wait_desc
FROM sys.databases 
WHERE log_reuse_wait_desc =  ‘ACTIVE_TRANSACTION’ AND database_id = <your database id>)

–Find out the user and which query is holding it open
SELECT  s.SPID,S.OPEN_TRAN,TEXT,s.Hostname,s.nt_domain,nt_username,net_address,s.loginame,
s.login_time, s.last_batch, s.status, s.sid, s.hostname as [Host_Name],
s.program_name, s.cmd, s.net_library,  GETDATE() as InputDate
FROM SYS.SYSPROCESSES S CROSS APPLY SYS.DM_EXEC_SQL_TEXT(S.SQL_HANDLE)AS A
WHERE OPEN_TRAN<>0

The really nice thing about this query is that it returns the Text fo the actual query which is holding the log open, as well as program_name which is running it and the Host_Name.

image

I set up a SQL Server Agent job to run the package every 5 minutes, since I only wanted to capture items which were long running. 

Using this package I was able to very quickly find out that there was an automated process on SharePoint which was running every hour but for whatever reason was never able to complete (that’s another story). Because the transaction didn’t successfully complete it remained flagged as Active, the Checkpoint for the log was not removed and the log just kept growing and was never truncated.  Once the issue with the SharePoint job was resolved the log file was able to resume normal behaviour and Truncate on Checkpoint as expected.

Populating a table with ISO Weeks using SSIS
I normally use dimDate tables in my projects, but for this client it made sense to have this at the week level.  Rather than sticking with my usual dimDate stored procedure to build out the table and attributes, I thought I’d take the opportunity to migrate the logic over to an SSIS package.  Here is a quick overview of how it works.

In my SSIS package I created 4 variables. Three of these variables will be populated by the package. Only the StartDate needs to be populated by the user. In this case the first date to be populated in the table is the first day of 2010.

image

The tasks are fairly straightforward and the finished package looks like this.

image

I wanted to blog certain parts of this, largely so I can remember them the next time I do this. 

I will lay out the important SQL Statements used in these steps.  For specifics on how to set up variables and tasks using variables you can check out this post How to Set and Use Variables in SSIS Execute SQL Task

Set @StartDate to first Sunday from @StartDate
 

This task is in place to ensure that the StartDate is set to the correct day of the week, as required by the business.  This client has the start of their business week on Sunday.   If the user has entered a date into the package variable which is not a Sunday, this task will set the @StartDate to the nearest Sunday after the date in the variable.  The fact that the SQL Server DATEPART ISOWW starts on a Monday will be addressed later in this post. The CAST statement is added to allow the results to be inserted into the @StartDate string variable.

SELECT 
CAST(
CASE WHEN DATENAME(dw,?) = ‘Sunday’ THEN ? –@StartDate
ELSE DATEADD(d,8-DATEPART(dw,?),?) END
as nvarchar) as NewStartDate

image


Set @EndDate to to last ISO Week in current year

The client wants the table to contain weeks up to the last week of the current ISO year.  When we move into next year, the new year will automatically be added.  You can edit this statement to meet your business requirements.  The CAST statement is added to allow the results to be inserted into the @EndDate string variable.

SELECT
CAST(
–Check to see if current year is 52 or 53 weeks
CASE WHEN DATEPART(ISOWW,DATEADD(WEEK,53 – DATEPART(ISOWW,GETDATE()),GETDATE())) = 1
THEN DATEADD(WEEK,52 – DATEPART(ISOWW,GETDATE()),GETDATE())
ELSE DATEADD(WEEK,53 – DATEPART(ISOWW,GETDATE()),GETDATE())
END
as nvarchar)
as EndDate


Set @LoopNumberOfWeeks

This will find the number of weeks between the StartDate and the EndDate for use in the For Loop Container.  I added 1, because I chose to start my Loop at 1 rather than 0.

SELECT DATEDIFF(wk,?,?) + 1 as NumberOfWeeks

image


For Loop Container

The container is set to look through the number of weeks calculated in the Set @LoopNumberOfWeeks task. Note that the InitExpression is 1 instead of 0.  I am using the @LoopWeek variable to populate one of the fields in my table, which is why I wanted to start with 1.

image


Insert record into dimAccWeek_New
 

INSERT INTO [dimAccWeek_new]
           ([AccWeekSK],
            [AccWeekStartDate])

SELECT  
? as AccWeekSK,
? as AccWeekStartDate

image


Add 7 days to @StartDate

Instead of using the loop to move the date forward one week, I am updating the variable with an Execute SQL Task inside the loop.  The CAST statement is added to allow the results to be inserted into the @StartDate string variable.

SELECT
CAST(
DATEADD(dd,7,?)
as nvarchar)  as LoopWeek

image


Update attributes

Here is the meat of it.   When using the DATEPART ISOWW on their SQL Server, the ISO Week starts on a Monday. Since business week starts on a Sunday I am adding 1 day when calculating where it falls within a Week, Quarter, Year

UPDATE dimAccWeek_new
   SET AccWeekSK = CASE
    –When date is > the first week and date between Jan 1 and 3 then PrevYr + ISOWeek
    WHEN DATEPART(ISOWW,DATEADD(dd,1,AccWeekStartDate)) > 1
    AND DATEPART(ISOWW,DATEADD(dd,1,AccWeekStartDate)) BETWEEN  CAST(DATEPART(Year,AccWeekStartDate) as varchar) + ‘0101’
        AND CAST(DATEPART(Year,AccWeekStartDate) as varchar) + ‘0103’
    THEN CAST(DATEPART(Year,AccWeekStartDate)-1 AS varchar) + RIGHT((’00’ + CAST(DATEPART(ISOWW,DATEADD(dd,1,AccWeekStartDate)) as varchar)),2)
    –When date = the first week and date between Dec 29 and Dec 31 then NextYr + ISOWeek
    WHEN DATEPART(ISOWW,DATEADD(dd,1,AccWeekStartDate)) = 1
    AND AccWeekStartDate
        BETWEEN  CAST(DATEPART(Year,AccWeekStartDate) as varchar) + ‘1229’
        AND CAST(DATEPART(Year,AccWeekStartDate) as varchar) + ‘1231’
    THEN CAST(DATEPART(Year,AccWeekStartDate)+1 AS varchar)  + RIGHT((’00’ + CAST(DATEPART(ISOWW,DATEADD(dd,1,AccWeekStartDate)) AS varchar)),2)
    –ELSE CurrentYr + ISOWeek
    ELSE CAST(DATEPART(Year,AccWeekStartDate) AS varchar) + RIGHT((’00’ + CAST(DATEPART(ISOWW,DATEADD(dd,1,AccWeekStartDate)) AS varchar)),2)END

      ,AccYear = CASE
    –When date is > the first week and date between Jan 1 and 3 then PrevYr
    WHEN DATEPART(ISOWW,DATEADD(dd,1,AccWeekStartDate)) > 1
    AND DATEPART(ISOWW,DATEADD(dd,1,AccWeekStartDate)) BETWEEN  CAST(DATEPART(Year,AccWeekStartDate) as varchar) + ‘0101’
        AND CAST(DATEPART(Year,AccWeekStartDate) as varchar) + ‘0103’
    THEN CAST(DATEPART(Year,AccWeekStartDate)-1 AS varchar)
    –When date = the first week and date between Dec 29 and Dec 31 then NextYr
    WHEN DATEPART(ISOWW,DATEADD(dd,1,AccWeekStartDate)) = 1
    AND AccWeekStartDate
        BETWEEN  CAST(DATEPART(Year,AccWeekStartDate) as varchar) + ‘1229’
        AND CAST(DATEPART(Year,AccWeekStartDate) as varchar) + ‘1231’
    THEN CAST(DATEPART(Year,AccWeekStartDate)+1 AS varchar)
    –ELSE CurrentYr
    ELSE CAST(DATEPART(Year,AccWeekStartDate) AS varchar) END
   
      ,AccQuarter = CASE
    WHEN DATEPART(mm,AccWeekStartDate) BETWEEN  1 AND 3 THEN 1
    WHEN DATEPART(mm,AccWeekStartDate) BETWEEN  4 AND 6 THEN 2
    WHEN DATEPART(mm,AccWeekStartDate) BETWEEN  7 AND 9 THEN 3
    ELSE 4 END
   
      ,AccMonth = DATEPART(mm,AccWeekStartDate)
      ,AccWeek = DATEPART(ISOWW,DATEADD(dd,1,AccWeekStartDate))

      ,AccWeekEndDate = DATEADD(dd,6,AccWeekStartDate)


You can add as many attributes as you require. This should get you started.

How To Set and Use Variables in SSIS Execute SQL Task

I couldn’t find any step-by-step resources on this so I thought I’d blog it.  This is done in SQL Server 2008 R2. In this scenario I will use a SQL Statement to populate an SSIS variable, and then use that variable in another SQL Statement.

Create your variables

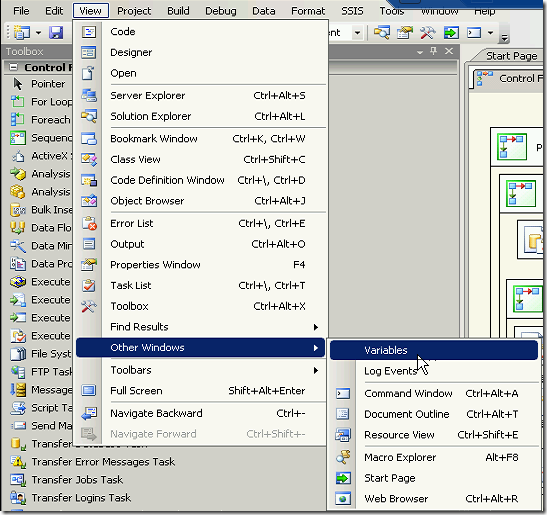
If the variables window isn’t visible already, from the menu select View –> Other Windows –> Variables.

SNAGHTML1fb1c4da

This will bring up your variables window on the left hand side of your screen.  You should be able to tab between it and the Toolbox.  You may have to pin it to your screen first.

image


I have already created some variables in the screenshot above.  To create a variable, first decide on the scope of the variable, whether it is the entire package, a container or a specific task.  I normally scope all of my variables to the package, since you can’t see the variables in the window unless you have selected the scoped object.  I find it easier to manage variables having them all in one place.  I have not had any compelling reason not to do it this way, although I’m sure there are cases where you may want them scoped differently. 

Before creating the variable you must select the item for it’s scope. In this case select the canvas of the Control Flow which will permit you to scope the variable to the entire package.  Then create the variable by clicking on the Add Variable button at the top of the Variables window.

image


Give your variable a Name, a Data Type and a Value.  In this case we are working with EndDate, and although you would want to set it as Date, there are some compatibility issues when using the Date data type for a variable and then pulling into a SQL parameter.  I have found it is best to set the date as a string and then manipulate it from there.  Set your EndDate attributes as shown, with the Scope being the name of your package.

image

Populate an SSIS variable using a SQL statement

From the Toolbox, drag an Execute SQL Task onto your Control Flow.  Double click on it and set the following properties:

On the General tab:

  1. Set the ResultSet to Single row
  2. Select your Connection to the database where you will run your SQL Statement
  3. Enter your SQL Statement

image

On the Result Set tab:

  1. In the Result Name key in the name of the field being return in your SQL Statement.  In this case I named the field EndDate
  2. In the Variable Name select the user variable you created.

image

Use the Variable in a SQL Statement

From the Toolbox, drag an Execute SQL Task onto your Control Flow. Double click on it and set the following properties:

On the General tab:

  1. Select your Connection to the database where you will run your SQL Statement
  2. Enter your SQL Statement, placing a ? where each variable is to be used.

image

In this case I need to add two Parameters to the Parameter Mapping tab, since I have used two question marks in my SQL Statement.  Even if you are using the same Variable multiple times, you still need to enter them separately on the Parameter Mapping tab, once for each time they appear in the SQL Statement.  This is the only way to identify which parameter is being used for which question mark.  Parameters are made much easier in 2012.

Here’s the tricky bit which isn’t at all self explanatory.

On the Parameter Mapping tab: 

  1. Select the user variable in the Variable Name drop down which corresponded to the first variable (?) being used in your SQL Statement.
  2. Set the Data Type to NVARCHAR, since we are using a string variable. (This is the spot where the data type compatibility didn’t mesh, which is why we opted for string).  
  3. Set the ParameterName to 0.  This indicates the order in which the parameter is appearing in the SQL statement.  You can enter them in the pane in any order you want, but the ParameterName must contain numbers starting from 0 to however many parameters you have minus one.  So if you have two parameters you must have one ParameterName = 0 and one ParameterName = 1.  You can reverse the order, but they must both exist or the task will fail.

image

Configure SSIS Logs

As a continuation of Creating an SSIS Package Template with Predefined Package Configurations I wanted to share with you another good habit for your package template.  I like to add logging to my packages for the purposes of troubleshooting, especially when there are complex processes with multiple packages running at once. It helps me track how long packages take to run and gives me the ability to see if there are changes over time, as well as the obvious error logging.

It is very simple to turn on the logging.  Simply right click on your Control Flow canvas and select Logging.

image

This is another place where having a sequence containers within your package are a good idea.  I generally have the entire package within one master sequence container, and then divide up the tasks within other sequence containers as necessary.  You can set the logging for the main Sequence Container within your package and you will notice that the other items within that container will inherit the logging configuration.  You can deselect certain tasks or containers if required.

image

I like to log errors in SQL Server.  To do this, change the Provider Type to SSIS log provider for SQL Server.

image

Click the Add button.  In the Configuration column use the dropdown to select the connection to the SQL database where you would like to store the logs.

image

Check the box beside the Package_Template container and then check the box beside the log you have just created.

image

Select the Details tab.  Specify which events you would like to capture.

image

Keep in mind that each event will take up space in your database.  Depending on how many packages you are logging and how often, you may with to only track important events, or you may wish to delete some or all of the events on a scheduled basis. 

Here are a few views I like to create for use when checking the logs.

CURRENT ERRORS

CREATE VIEW [dbo].[ssislog_ErrorsCurrent]
AS
SELECT     TOP (100) PERCENT PKG.PackageName, PKG.starttime AS PackageStartTime, LG.source AS TaskName, LG.starttime AS StartTime, LG.endtime AS EndTime,
                      LG.message
FROM         dbo.sysssislog AS LG INNER JOIN
                          (SELECT     LG1.executionid, LG1.source AS PackageName, LG1.starttime
                            FROM          dbo.sysssislog AS LG1 INNER JOIN
                                                       (SELECT     source, MAX(starttime) AS starttime
                                                         FROM          dbo.sysssislog
                                                         WHERE      (event = ‘PackageStart’)
                                                         GROUP BY source
                                                         HAVING      (MAX(starttime) > DATEADD(dd, – 1, GETDATE()))) AS CUR ON CUR.source = LG1.source AND CUR.starttime = LG1.starttime
                            WHERE      (LG1.event = ‘PackageStart’)) AS PKG ON LG.executionid = PKG.executionid
WHERE     (LG.event IN (‘OnError’))
ORDER BY PackageStartTime DESC, StartTime


CURRENT LOG ENTRIES

CREATE VIEW [dbo].[ssislog_LogEntriesCurrent]
AS
SELECT     TOP (100) PERCENT PKG.PackageName, PKG.starttime AS PackageStartTime, LG.source AS TaskName, LG.starttime, LG.endtime, LG.message
FROM         dbo.sysssislog AS LG INNER JOIN
                          (SELECT     LG1.executionid, LG1.source AS PackageName, LG1.starttime
                            FROM          dbo.sysssislog AS LG1 INNER JOIN
                                                       (SELECT     source, MAX(starttime) AS starttime
                                                         FROM          dbo.sysssislog
                                                         WHERE      (event = ‘PackageStart’)
                                                         GROUP BY source
                                                         HAVING      (MAX(starttime) > DATEADD(dd, – 1, GETDATE()))) AS CUR ON CUR.source = LG1.source AND CUR.starttime = LG1.starttime
                            WHERE      (LG1.event = ‘PackageStart’)) AS PKG ON LG.executionid = PKG.executionid
ORDER BY LG.endtime DESC

PACKAGE DURATION

CREATE VIEW [dbo].[ssislog_PackageDurationCurrent]
AS
SELECT     TOP (100) PERCENT source AS PackageName, MIN(starttime) AS StartTime, MAX(starttime) AS EndTime, DATEDIFF(MI, MIN(starttime), MAX(starttime))
                      AS DurationInRoundedMinutes, DATEDIFF(ss, MIN(starttime), MAX(starttime)) AS DurationInTotalSeconds
FROM         dbo.sysssislog
WHERE     (event IN (‘PackageEnd’, ‘PackageStart’)) AND (starttime > DATEADD(dd, – 1, GETDATE()))
GROUP BY executionid, source
ORDER BY starttime DESC

I hope you find this useful.

SSIS: Connect to PostgreSQL

There is a great blog post on Connecting to a PostgreSQL Instance Using SQL Server Integration Services which you’ll want to read.  I will recap the steps directly from this post:

Installation of both drivers (32-bit & 64-bit) is identical. Here are the basic steps to get the driver working:

  1. Download the latest .msi file for Windows from this location: http://www.postgresql.org/ftp/odbc/versions/msi/
  2. Run the msi file on your SQL Server.
  3. Launch the ODBC Administrator Utility and choose the type of data source you need; File, System or User and click Add.
  4. The ODBC Administrator will present a list of drivers. Scroll to the bottom and you will see two options for PostreSQL; ANSI and Unicode. Select the version you need and click Finish.
  5. The Administrator will present a screen on which you must supply a database name, server name, user name and password.
  6. After you have supplied values for these fields, click the Datasource button and make sure the Use Declare/Fetch box is checked. The driver will fail to retrieve larger datasets if you do not check this box. I have not yet found a satisfactory answer for why this is so.

Now you are ready to build a new connection manager in SSIS and hook it to the PostGRES data source you just created. Use the following settings when building out the connection manager:

  1. Select the .Net ProvidersODBC Data Provider.
  2. Select the “Use connection string” radio button. Using the values you configured in the ODBC Administrator, build a connection string as follows: Dsn=PostgreSQL35W;uid=User1
  3. Enter the User name and Password in the fields provided.
  4. Test the connection and you should be ready to go.


Here are a few bits of information I’d like to add to this excellent blog post, mainly for my own purposes should I run into this again:

I noticed on the PostgreSQL msi page that there were several versions of the drivers.  I took the most recent of the 32bit, psqlodbc_09_01_0100-1.zip.  The 64 bit drivers have “64 bit” in the name.

The 32-bit ODBC drivers for PostgreSQL get installed here C:Program Files (x86)psqlODBC

After installing the 32 bit driver per the instructions, in your Visual Studio solution be sure to change your Project Properties – Debugging – Run64BitRuntime property to False. This will force it to run in 32-bit mode.   

If you are triggering your package from SQL Server Agent, set the SQL Server Agent job to run in 32-bit mode

For SQL2012, be sure to put the password in a Project Parameter so it is retained in the package on deployment to Integration Services, and doesn’t get stripped out due to package protection.

Automate Import of SSIS Packages to File System

A client with SQL Server 2005 asked if there was a good way to import and deploy packages automatically, rather than having to do each package manually every time. This particular client has packages deployed to SQL Server Integration Services. I have written a separate blog post on the Automating Deployment of SSIS Packages in SQL 2005. Here is the solution for importing packages.

BIDS Solution:

Open (or create) the BIDS solution for the related packages which you want to import and deploy. The related packages should all reside in the same folder on Integration Services, otherwise the deployment piece will not work as it can’t deploy to multiple folders. You will need a separate BIDS solution for each SSIS folder, and you will need to create a separate _ImportPackages.dtsx package for each solution.

In order to make this somewhat scalable, the solution folder structures will need to incorporate the exact same folder name as the folder on SSIS, since the SSIS folder name will be used in the import query. For example, if your group of packages is deployed to a folder called “Maintenance” on SSIS, you will want your solution to be called something like “Maintenance ETL”. In this way, once you create your _ImportPackages.dtsx you will be able to copy it to the next solution and simply edit the folder name in the query and the Batch File connection manager. You’ll see what I mean.

Create SSIS Package to Import Deployed Packages:

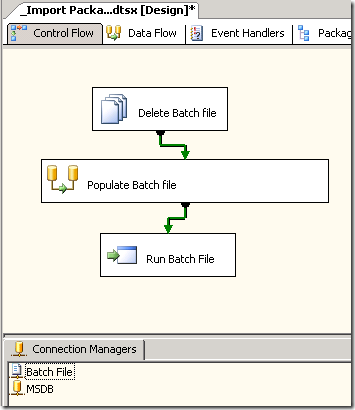
Create a new SSIS package called _ImportPackages.dtsx. I put the underscore in the name so it will float to the top of the SSIS solution when you open it, thereby reminding you to run the package and get the latest copies of the packages deployed to SSIS. The package will look like this:

clip_image001

CREATE CONNECTIONS

DATABASE:

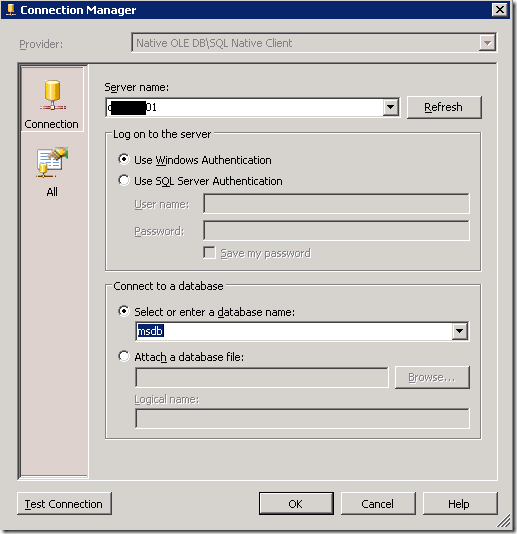
Create a connection to the msdb database on the server where the SSIS packages are being stored.

clip_image002

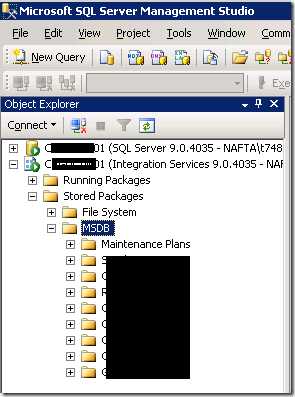
Although the packages are deployed out to Integration Services

clip_image003

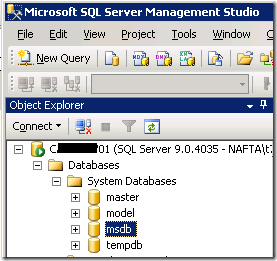
They are actually stored in the MSDB database, which is what you will write your source query against.

clip_image004


BATCH FILE:

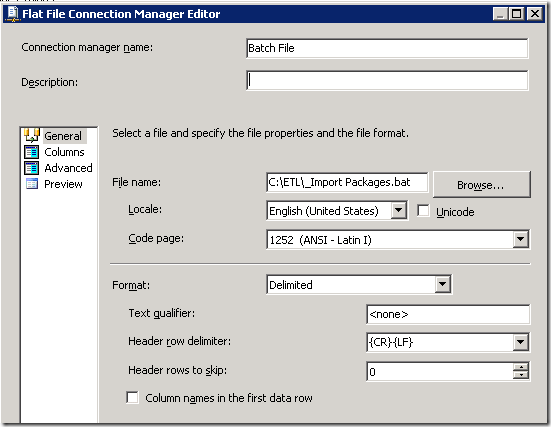
Create a Flat File Connection Manager called “Batch File”. Create a flat file called “_Import Packages.bat”. It will house the dtutil commands in a .bat file which will import all the dtsx packages from the MSDB. Choose a location within your BIDS SSIS solution folder, since you will have one of these batch files per BIDS SSIS solution.

clip_image005

There is one column called dtutil_command.

clip_image006

The column width is 4000 to accommodate the length of the dtutil command lines.

clip_image007

STEP 1 in the Package: Delete Batch File

Drag a File System task from the Toolbox into your Control Flow. Rename it “Delete Batch File”, and configure it to the operation “Delete file” with a Source Connection to the ”Batch File connection” you created above.

clip_image008

STEP 2 in the Package – Populate Batch File

Drag a Data Flow task from the Toolbox into the Control Flow surface. Rename it to Populate Batch File. Connect the “Delete Batch File” task to the “Populate Batch File” task on success. Move to the Data Flow tab and drag an OLE DB Source on the Data Flow surface. Configure it as follows:

clip_image009

Here is that Query again, so you can cut and paste it:

select
CAST(
‘dtutil /SQL "’
+ case
when len(FolderName) = 0 then ”
else FolderName + ”
end
+ [name]
+ ‘" /ENCRYPT FILE;"C:BI ProjectsETL’
+ case
when len(FolderName) = 0 then ”
else FolderName + ‘ ETL’ + FolderName + ‘ ETL’
end
+ [name]
+ ‘.dtsx";1’
+ ‘ /QUIET’ –suppresses prompt to delete if an older file with same name exists )
as nvarchar(4000))
as dtutil_command
from msdb.dbo.sysdtspackages90 pkg
join msdb.dbo.sysdtspackagefolders90 fld
on pkg.folderid = fld.folderid
WHERE foldername = ‘Maintenance’ —CHANGE VARIABLE
order by FolderName, [name]


The results of this query will look like this:

dtutil /SQL "MaintenancePackage1" /ENCRYPT FILE;"C:BI ProjectsETLMaintenance ETLMaintenance ETLPackage1.dtsx";1 /QUIET
dtutil /SQL "MaintenancePackage2" /ENCRYPT FILE;"C:BI ProjectsETLMaintenance ETLMaintenance ETLPackage2.dtsx";1 /QUIET

Notice that the folder name from SSIS is also used in the folder structure on the file system. You will need to adjust the query to suit your naming convention for your BIDS solutions.

Drag a Flat File Destination onto your Data Flow tab and connect the OLE DB source to the Flat File destination. Configure the Flat File destination to the Batch File connection.

clip_image010

Step 3 in the Package: Run Batch file

Drag and Execute Process task from the Toolbox onto the Control Flow tab. Connect the “Populate Batch File” task to the “Run Batch File” task on success. Configure the Executable on the Process tab by navigating to the _Import Packages.bat you created earlier.

clip_image011

Now you can run the SSIS package you just created. It will import all the packages in the specified SSIS folder into the solution folder you specified in the SQL Query.

***Please note that this will not add any new packages to your BIDS solution. It will only refresh existing packages with any deployed changes. You will still need to add the packages within the BIDS solution to the SSIS Packages folder even though they are sitting in the file system. You don’t want to simply ‘Add Existing Package’ either, as you will end up with a duplicate file in your BIDS directory.  I’ve blogged a simple way to Add Multiple Packages to a BIDS solution

Automate Deployment of SSIS Packages on SQL 2005

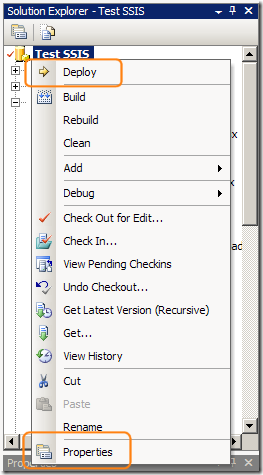
After much playing with SSIS packages I worked out how to Automate Import of Packages to File System using SQL to write out a dtutil batch file.  Then I worked on how to deploy packages back out to the SQL store from the file system. I imagine it might have been accomplished in a similar fashion as the import using a For Each File loop.  Instead I came across a very simple solution for deploying packages to the SQL Store. There is a free CODEPLEX download called BIDS Helper. It doesn’t even require an install,  It’s just an Add In for Visual Studio.

Simply download the appropriate zip file version from here and unpack it into your My DocumentsVisual Studio <version>Addins folder. Close and reopen BIDS and the deploy functionality is there.

clip_image001

More detailed instructions on using it are here.

**Please note, if you have passwords embedded in your packages and want the ability to automatically deploy while maintaining the correct protection level you might want to use Package Configurations to maintain the passwords.  In this way the passwords won’t get stripped from the package on deployment since they will be stored in SQL Server or elsewhere.

Add Multiple Packages to BIDS Solution

A very simple way to add multiple new packages to a solution is to place them in a temporary folder other than the solution folder (otherwise they will be duplicated), and then in Windows Explorer to multi-select them, copy them then navigate to the SSIS Packages folder in your BIDS solution paste them.

If you used the package created in the Automate Import of SSIS Packages to File System post, then first move the packages out of the solution folder into another folder. I will temporarily move them into one folder upwards. C:BI ProjectsETLMaintenance ETL

clip_image001

Now multi-select the packages you have moved and Copy them (CTRL+C – or- right click Copy).

clip_image002

Navigate to your BIDS solution and select the SSIS Packages folder. Paste the packages. (CTRL+V – or- right click Paste)

clip_image003

The packages are now part of the solution.

clip_image004

They have also been added to the solution folder.

clip_image005

Don’t forget to delete the packages from your temporary folder once they have been successfully added to your solution.

Importing data from Active Directory Using SSIS
This is a neat little trick.  My client wanted to filter a report by employee manager, but didn’t have a good way to maintain the list of employees and their managers.  There were a few possibilities, but we wanted to use a system that already maintained the relationship between employee and manager.  We decided to pull the information out of Active Directory, using an SSIS package.

Addendum Sept. 12, 2012:  The approach outlined below works fine for a simple data set where the query will not return more records than the AD paging file size will allow (typically 1000 records), and you are only querying single value attributes.  However, I recommend you use this Script Task approach instead of using a Data Flow.  It is more powerful and flexible yet still simple method of importing any size data set from Active Directory, regardless of paging file size.  Read the step-by-step here:  Get around Active Directory Paging on SSIS import

Find the Active Directory Server

The first thing I needed to know was which server Active Directory resided on.  I didn’t want to have wait for I.T. to get back to me with that answer.  There is a very easy way to find this out if you are logged into the same domain.  Just run a command prompt and use the command

ping %USERDNSDOMAIN%

This will return the active directory server name and IP address.

Create the ADO.NET Connection in SSIS

Create your SSIS solution and your package.  Now create the connection to the Active Directory server.  There is a little trick to this.  In order to use the connection in a data flow you need to create an ADO.NET connection.  During the create process, in the Provider drop down, change the Provider to OLE DB Provider for Microsoft Directory Services.  Then enter your server name and test as normal.  If you were to create an OLE DB connection instead of ADO.NET and change the provider, it would not work for Data Flow connections.  It must be an ADO.NET connection type. 
image

Use ADO NET Source in your Data Flow

On the data flow tab, drag an ADO.NET Source onto the design surface.  Open up the ADO.NET Source Editor and choose the connection you created in the previous step.  Choose “SQL Command” for Data Access mode.  Now you will write a query to pull the desired information from Active Directory.  Your query will look something like this:

SELECT displayName, Mail, Title, physicalDeliveryOfficeName,  telephoneNumber, Manager, name, sAMAccountName
  FROM ‘LDAP://yourservername’
WHERE objectClass=’user’

or this, depending on how you like to structure your LDAP queries.

<LDAP://yourservername>; (objectClass=user); displayName, Mail, Title, physicalDeliveryOfficeName, telephoneNumber, Manager, name, sAMAccountName

You must put single quotes around the server.  For more information on what attributes are available to be imported from Active Directory I found this to be helpful:  http://www.kouti.com/tables/userattributes.htm

You can test your query in SSMS like this:

SELECT displayName, Mail, Title, physicalDeliveryOfficeName, telephoneNumber, Manager, name, sAMAccountName

FROM Openquery (adsi, ‘SELECT displayName, Mail, Title, physicalDeliveryOfficeName, telephoneNumber, Manager, name, sAMAccountName

FROM “LDAP://yourservername” WHERE objectClass = ”user” ‘)

For this SQL Query to work you will need to add your AD server as a linked servier on your SQL server and name it ADSI.   In SSMS open up Server Objects and right click on Linked Servers.  Select New Linked Server.   On the General tab select “OLE DB Provider for Microsoft Directory Services” as the Provider.  Type in your AD server name in the Product Name and the Data source.  Leave the other fields blank and click OK. 

When running your query, if you get an error like this:  “Cannot fetch a row from OLE DB provider “ADsDSOObject” for linked server “adsi”,  there is a good chance your query is returning more rows than the AD paging file size allows.  In that case you can do one of two things: 1) filter your query further to return fewer rows (try filtering on a specific sAMAccountName to be sure that the query syntax isn’t the problem) or 2) use a C# script which is not affected by paging file size as outlined here Get around Active Directory Paging on SSIS import .

Data Formatting

Each field will be of NTEXT type.  You can leave them as NTEXT if this is an acceptable format for your destination, or you can add Derived Columns which convert the values in an expression, like this:

(DT_WSTR,50)sAMAccountName

image


Add your Destination

Add your data flow destination and map the fields as you wish.  In this case I created a table in the data warehouse to receive the Active Directory data.

You can now finish your package and deploy it.  This is a simple but very powerful method.  I found it very useful and I know I’m going to be using it again.

Addendum Sept. 12, 2012: This approach works fine for a simple data set where the query will not return more records than the AD paging file size will allow (typically 1000 records), and you are only querying single value attributes. However, I recommend you use this Script Task approach instead of using a Data Flow. It is more powerful and flexible yet still simple method of importing any size data set from Active Directory, regardless of paging file size. Read the step-by-step here: Get around Active Directory Paging on SSIS import

 Credits

In preparing this post, I found the following articles to be useful:

http://social.technet.microsoft.com/wiki/contents/articles/processing-active-directory-information-in-ssis.aspx

http://www.kouti.com/tables/userattributes.htm