Creating an HTML table in a Nintex Workflow

In my previous post Exporting InfoPath repeating table data with Nintex Workflow I talked about how to pull repeating data from an InfoPath form for use in a Nintex workflow.  You’ll want to read it first to understand where these steps fit.  The client want the repeating data exported in the previous post to be displayed in table format in an approver email.  I added a few steps before, during and after the For Each loop to build the HTML statement used in the body of the email.

BEFORE THE LOOP

Add a Build string action to the workflow before the loop.

image

Add a variable called LineDetailTable of type Single line of text. Configure the action as follows:

image

DURING THE LOOP

Within the loop, after the XML has been queried, add a Build string action to add the HTML for each of the repeating lines from the InfoPath form.

image

Configure the action to append the line details to the LineDetailTable variable:

image

AFTER THE LOOP

After the loop has completed, and the data from all the repeating lines has been added to the string variable, finish off the table in another Build string action.

image

In this case I included the Line Items table within another table that contained header information about the form.  I controlled the font within both tables using styles.

image

DISPLAY LINE DETAILS TABLE IN AN EMAIL

I was able to display the HTML table in an email simply by inserting the workflow variable into the body of the email.

image

The table rendered in the email like this:

image

Exporting InfoPath repeating table data with Nintex Workflow

A client wanted to store the data from an InfoPath form with a repeating table as a step in a Nintex Workflow.  Users were submitting expenses in SharePoint and could have multiple expenses in the form. The data was pulled out of the InfoPath form by querying the XML, and was stored in the workflow variables for use further in the workflow. The relevant portions of the workflow look like this:

imageimage

image
GET LINE ITEMS

Add a Query XML action to your Nintex workflow called “Get line items”.  Set up a variable call LineItems which is of Collection type.  Configure the action as follows:

image

If you don’t know the XPath you can look at your form in InfoPath, right click on the field you are interested in, and select Copy XPath.  This will copy it to your clipboard, and you can paste it into your action.

image

FOR EACH LINE ITEM

Add a For Each action to your workflow called “For each line item”. This will loop through each of the items queried in Get Line Items, above, and store the current line in a text variable. Add a variable to your workflow called LineItem which is a Single line of text.  Configure the action as follows:

image

EXTRACT DATA FROM LINE ITEMS

Add the relevant logic to your workflow and incorporate the Query XML actions to pull the individual fields you want from your InfoPath form.  From the screenshot of the flow, above, you would configure Extract Submit Date as follows:

image

The relevant data points you have queried in your Query XML actions are stored in the workflow variables, and are ready to be used to build and execute a SQL Insert statement during each loop.  (***UDATE 2014-08-11:  A reader has pointed out that the XML source in this screenshot should actually be the string variable “Line Item”.  I will check this at a later date, but am updating the post to point readers in the right direction.***)

BUILD SQL INSERT STATEMENT

Drag a Build String action into your workflow, within the For Each loop.  Add a variable called InsertStatementForSQL of type Single line of text .  Build your insert statement in the Text portion of the action and store it in the InsertStatementForSQL variable.  Use the Insert Reference button to insert the workflow variables.  Note that if you are inserting a string value from a variable into the SQL table you need to surround it with single quotes so SQL will recognize it as a string.

image

EXECUTE SQL STATEMENT

Drag an Execute SQL action onto your workflow, within the For Each loop.  In this case I’ve used a Workflow Constant for the connection.  You can configure your connection string as necessary.  In the query, click on the Insert Reference button and select the InsertStatementForSQL variable you populated in the previous step.

image

Voila, your workflow will loop through each repeating line of your form and build and execute a SQL statement inserting that data into a table.

In this case the client also want the data displayed in an email.  My next post talks about that – Creating an HTML Table in a Nintex Workflow

Activating SSRS Report Content Types for SharePoint

For information on how to set up a report library and the relevant content types in SharePoint see this previous post – Create A Sharepoint SSRS Report Library

I recently had trouble publishing an SSRS report to SharePoint.  I was unable to find the Report Server content types on the library.  I needed to activate the Report Server Integration Feature in order to be able to add the SSRS content types to the library.  Here is how to do that.

Go to Site Settings

image

Under Site Collection Administration, choose Site collection features

image

Beside Report Server Integration Feature click the Activate button.

image

That’s it, you’re done. Now you will find the Report Server content types listed in the Site Content Types

Moving SharePoint Documents to the File System

You’ll want to read my previous post Moving SharePoint List Attachments to the File System, to get all the details and requirements for setting up and running these SSIS script tasks.

This is an SSIS Package code which will iterate through the document library to get some relevant information about the documents, and then move specified documents from a document library to the file system.

I will just explain the two script tasks steps, as the rest will be specific to your task.

image

Populate SP_ExpenseAttachments Sript Task

This code iterate through the document library to get some relevant information about the documents

using System;
using System.Data;
using Microsoft.SqlServer.Dts.Runtime;
using System.Windows.Forms;
using System.IO;
using Microsoft.SharePoint;
using System.Data.SqlClient;
using System.Net;

namespace ST_573f63e769424529b4c14ec196d01e4f.csproj
{
    [System.AddIn.AddIn("ScriptMain", Version = "1.0", Publisher = "", Description = "")]
    public partial class ScriptMain : Microsoft.SqlServer.Dts.Tasks.ScriptTask.VSTARTScriptObjectModelBase
    {

        #region VSTA generated code
        enum ScriptResults
        {
            Success = Microsoft.SqlServer.Dts.Runtime.DTSExecResult.Success,
            Failure = Microsoft.SqlServer.Dts.Runtime.DTSExecResult.Failure
        };
        #endregion

        /*
        The execution engine calls this method when the task executes.
        To access the object model, use the Dts property. Connections, variables, events,
        and logging features are available as members of the Dts property as shown in the following examples.

        To reference a variable, call Dts.Variables["MyCaseSensitiveVariableName"].Value;
        To post a log entry, call Dts.Log("This is my log text", 999, null);
        To fire an event, call Dts.Events.FireInformation(99, "test", "hit the help message", "", 0, true);

        To use the connections collection use something like the following:
        ConnectionManager cm = Dts.Connections.Add("OLEDB");
        cm.ConnectionString = "Data Source=localhost;Initial Catalog=AdventureWorks;Provider=SQLNCLI10;Integrated Security=SSPI;Auto Translate=False;";

        Before returning from this method, set the value of Dts.TaskResult to indicate success or failure.

        To open Help, press F1.
    */

        public void Main()
        {
            // Read the Library document info and write it to a SQL table

            string SharePointSite = (string)Dts.Variables["SPSite"].Value;
            SPSite mySite = new SPSite(SharePointSite);
            SPWeb myWeb = mySite.OpenWeb();
            SPList myList = myWeb.Lists["ExpenseAttachments"];
            SPDocumentLibrary myLibrary = (SPDocumentLibrary)myList;
            SPListItemCollection collListItems = myLibrary.Items;

            foreach (SPListItem myListItem in collListItems)
           {
               String ItemId = myListItem.ID.ToString();
               String attachmentAbsoluteURL = SharePointSite + "/" + myListItem.File.Url;

                String attachmentname = myListItem.File.Name;

                //Set up SQL Connection

                string sSqlConn = Dts.Variables["SqlConn"].Value.ToString();
                SqlConnection sqlConnection1 = new SqlConnection(sSqlConn);
                SqlCommand cmd = new SqlCommand();
                SqlDataReader reader;
                cmd.CommandType = CommandType.Text;
                cmd.Connection = sqlConnection1;
                sqlConnection1.Open();

                cmd.CommandText = "INSERT INTO SP_ExpenseAttachments (WorkflowName,DocumentLibrarySharePointID,AttachmentName,AttachmentURL) VALUES ('Expense','" + ItemId + "','" + attachmentname + "','" + attachmentAbsoluteURL + "')";

                reader = cmd.ExecuteReader();
                sqlConnection1.Close();

                    }

                    Dts.TaskResult = (int)ScriptResults.Success;
                }
            }
        }
Read Attachment information and move Expense attachments

This code accepts a document id from a variable, populates some relevant information about the document into a SQL table and copies and renames the document to the file system.

using System;
using System.Data;
using Microsoft.SqlServer.Dts.Runtime;
using System.Windows.Forms;
using System.IO;
using Microsoft.SharePoint;
using System.Data.SqlClient;
using System.Net;

namespace ST_573f63e769424529b4c14ec196d01e4f.csproj
{
    [System.AddIn.AddIn("ScriptMain", Version = "1.0", Publisher = "", Description = "")]
    public partial class ScriptMain : Microsoft.SqlServer.Dts.Tasks.ScriptTask.VSTARTScriptObjectModelBase
    {

        #region VSTA generated code
        enum ScriptResults
        {
            Success = Microsoft.SqlServer.Dts.Runtime.DTSExecResult.Success,
            Failure = Microsoft.SqlServer.Dts.Runtime.DTSExecResult.Failure
        };
        #endregion

        /*
        The execution engine calls this method when the task executes.
        To access the object model, use the Dts property. Connections, variables, events,
        and logging features are available as members of the Dts property as shown in the following examples.

        To reference a variable, call Dts.Variables["MyCaseSensitiveVariableName"].Value;
        To post a log entry, call Dts.Log("This is my log text", 999, null);
        To fire an event, call Dts.Events.FireInformation(99, "test", "hit the help message", "", 0, true);

        To use the connections collection use something like the following:
        ConnectionManager cm = Dts.Connections.Add("OLEDB");
        cm.ConnectionString = "Data Source=localhost;Initial Catalog=AdventureWorks;Provider=SQLNCLI10;Integrated Security=SSPI;Auto Translate=False;";

        Before returning from this method, set the value of Dts.TaskResult to indicate success or failure.

        To open Help, press F1.
    */

        public void Main()
        {
            // Read the document info and write it to a SQL table

            string SharePointSite = (string)Dts.Variables["SPSite"].Value;
            SPSite mySite = new SPSite(SharePointSite);
            SPWeb myWeb = mySite.OpenWeb();
            SPList myList = myWeb.Lists["ExpenseAttachments"];
            SPDocumentLibrary myLibrary = (SPDocumentLibrary)myList;
            SPListItemCollection collListItems = myLibrary.Items;

            int ItemID = (int)Dts.Variables["ItemID"].Value;
            String sItemID = ItemID.ToString();

            SPListItem myListItem = myList.GetItemById(ItemID);
            String attachmentAbsoluteURL = SharePointSite + "/" + myListItem.File.Url;

                String attachmentname = myListItem.File.Name;

                //Set up SQL Connection

                string sSqlConn = Dts.Variables["SqlConn"].Value.ToString();
                SqlConnection sqlConnection1 = new SqlConnection(sSqlConn);
                SqlCommand cmd = new SqlCommand();
                SqlDataReader reader;
                cmd.CommandType = CommandType.Text;
                cmd.Connection = sqlConnection1;
                sqlConnection1.Open();

                cmd.CommandText = "INSERT INTO SP_Attachments  (WorkflowName, DocumentLibrarySharePointID, AttachmentName, AttachmentURL, Moved, NewFileName) VALUES ('Expense','" + ItemID +"','" + attachmentname + "','" + attachmentAbsoluteURL + "','" + 0 + "','E' + RIGHT('00000000000' + CAST(" + ItemID + " as VARCHAR),11)" + ")";

                reader = cmd.ExecuteReader();
                sqlConnection1.Close();

                string MRI = (string)Dts.Variables["MRI_File_Location"].Value;
                DirectoryInfo dir = new DirectoryInfo(MRI);

                if (dir.Exists)
                {

                    // Create the filename for local storage using 
                    String FileExt = attachmentname.Substring(attachmentname.Length-4);
                    String ItemNum = "00000000000" + sItemID;
                    String ItemName = ItemNum.Substring(sItemID.Length, 11);
                    String FileName = "\E" + ItemName + FileExt;
                    FileInfo file = new FileInfo(dir.FullName + FileName);

                    if (!file.Exists)
                    {
                        if (attachmentAbsoluteURL.Length != 0)
                        {
                            // download the file from SharePoint or Archive file system to local folder 
                            WebClient client = new WebClient();

                            //download the file from SharePoint 

                            client.Credentials = System.Net.CredentialCache.DefaultCredentials;
                            client.DownloadFile(attachmentAbsoluteURL, file.FullName);

                        }
                        //Mark record as Moved
                        sqlConnection1.Open();
                        DateTime Now = DateTime.Now;
                        cmd.CommandText = "UPDATE SP_Attachments SET Moved = 1, Moved_Date = '" + Now + "' WHERE WorkflowName = 'Expense' and DocumentLibrarySharePointID = '" + ItemID + "'";
                        reader = cmd.ExecuteReader();
                        sqlConnection1.Close();

                    }

                    Dts.TaskResult = (int)ScriptResults.Success;
                }
            }
        }
    }

Moving SharePoint List Attachments to the File System

You can use a Script Task in SSIS to move SharePoint list attachments to the file system.  This C# code references the Microsoft.SharePoint assembly. It’s very important to note that the the SharePoint attachments have to be on the same server that the package is running on.  Thes means that the package can only run on SSIS installed on the SharePoint box where the attachments are.  You will need to install SSIS and the corresponding msdb database on your SharePoint server if it isn’t already installed.

This is what the final package looks like:

image

Most of the these tasks are self explanatory and you’ll need to set up your own tables and logic to accomplish the goals of your package.  You’ll want a table that tells you which items have attachments.  See this post for details on how to import data from a SharePoint list.  Attachments is one of the fields you can import, which is simply a bit that says whether or not the list item has any attachments.

These are the variables used in the package:

image

For Each Loop:

image


image

Variables used in the script task:

image

References needed in the script task:

image


Here is the C# code:

using System;
using System.Data;
using Microsoft.SqlServer.Dts.Runtime;
using System.Windows.Forms;
using System.IO;
using Microsoft.SharePoint;
using System.Data.SqlClient;
using System.Net;

namespace ST_573f63e769424529b4c14ec196d01e4f.csproj
{
    [System.AddIn.AddIn("ScriptMain", Version = "1.0", Publisher = "", Description = "")]
    public partial class ScriptMain : Microsoft.SqlServer.Dts.Tasks.ScriptTask.VSTARTScriptObjectModelBase
    {

        #region VSTA generated code
        enum ScriptResults
        {
            Success = Microsoft.SqlServer.Dts.Runtime.DTSExecResult.Success,
            Failure = Microsoft.SqlServer.Dts.Runtime.DTSExecResult.Failure
        };
        #endregion

        /*
        The execution engine calls this method when the task executes.
        To access the object model, use the Dts property. Connections, variables, events,
        and logging features are available as members of the Dts property as shown in the following examples.

        To reference a variable, call Dts.Variables["MyCaseSensitiveVariableName"].Value;
        To post a log entry, call Dts.Log("This is my log text", 999, null);
        To fire an event, call Dts.Events.FireInformation(99, "test", "hit the help message", "", 0, true);

        To use the connections collection use something like the following:
        ConnectionManager cm = Dts.Connections.Add("OLEDB");
        cm.ConnectionString = "Data Source=localhost;Initial Catalog=AdventureWorks;Provider=SQLNCLI10;Integrated Security=SSPI;Auto Translate=False;";

        Before returning from this method, set the value of Dts.TaskResult to indicate success or failure.

        To open Help, press F1.
    */

        public void Main()
        {
            // Read the attachments info and write it to a SQL table

            string SharePointSite = (string)Dts.Variables["SPSite"].Value;
            SPSite mySite = new SPSite(SharePointSite);
            //SPSite mySite = new SPSite("http://primenetdev/forms");
            SPWeb myweb = mySite.OpenWeb();
            SPList myList = myweb.Lists["Fitness Reimbursement Authorization"];

            int ItemID = (int)Dts.Variables["ItemID"].Value;
            SPListItem myListItem = myList.GetItemById(ItemID);
            int i = 1;
            foreach (String attachmentname in myListItem.Attachments)
            {
                //                MessageBox.Show("Each attachment");
                String attachmentAbsoluteURL =
                myListItem.Attachments.UrlPrefix // gets the containing directory URL
                + attachmentname;

                //Set up SQL Connection

                string sSqlConn = Dts.Variables["SqlConn"].Value.ToString();

                SqlConnection sqlConnection1 = new SqlConnection(sSqlConn);

                SqlCommand cmd = new SqlCommand();

                SqlDataReader reader;

                cmd.CommandType = CommandType.Text;

                cmd.Connection = sqlConnection1;

                sqlConnection1.Open();
                //If its the first attachement, name it 12 digits ending in the Item ID
                if ((i.Equals(1)))
                {
                    cmd.CommandText = "INSERT INTO SP_Attachments  (WorkflowName, ItemSharePointID, AttachmentName, AttachmentURL, Moved, NewFileName) VALUES ('Fitness','" + ItemID + "','" + attachmentname + "','" + attachmentAbsoluteURL + "','" + 0 + "','F' + RIGHT('00000000000' + CAST(" + ItemID + " as VARCHAR),11)" + ")";
                }
                //Otherwise append an attachment id
                else
                {
                    cmd.CommandText = "INSERT INTO SP_Attachments  (WorkflowName, ItemSharePointID, AttachmentName, AttachmentURL, Moved, NewFileName) VALUES ('Fitness','" + ItemID + "','" + attachmentname + "','" + attachmentAbsoluteURL + "','" + 0 + "','F' + RIGHT('00000000000' + CAST(" + ItemID + " as VARCHAR),11) + CAST(" + i + "as VARCHAR))";
                }
                reader = cmd.ExecuteReader();
                sqlConnection1.Close();

                string MRI = (string)Dts.Variables["MRI_File_Location"].Value;
                DirectoryInfo dir = new DirectoryInfo(MRI);

                if (dir.Exists)
                {

                    // Create the filename for local storage using 

                    String ItemNum = "00000000000" + ItemID.ToString();
                    String ItemName = ItemNum.Substring(ItemID.ToString().Length, 11);
                    String FileName = "\F" + ItemName + i;
                    //If its the first attachement, name it 12 digits ending in the Item ID, otherwise append which attachement it is
                    if ((i.Equals(1)))
                    {
                        FileName = "\F" + ItemName;
                    }
                    FileInfo file = new FileInfo(dir.FullName + FileName);
                    i = i + 1;

                    if (!file.Exists)
                    {

                        if (attachmentAbsoluteURL.Length != 0)
                        {
                            // download the file from SharePoint or Archive file system to local folder 

                            WebClient client = new WebClient();

                            //if (Strings.Left(fileUrl, 4).ToLower() == "http") {
                            //download the file from SharePoint 

                            client.Credentials = System.Net.CredentialCache.DefaultCredentials;

                            client.DownloadFile(attachmentAbsoluteURL, file.FullName);

                        }
                        //Mark record as Moved
                        sqlConnection1.Open();
                        DateTime Now = DateTime.Now;
                        cmd.CommandText = "UPDATE SP_Attachments SET Moved = 1, Moved_Date = '" + Now + "' WHERE ItemSharePointID = '" + ItemID + "'";
                        reader = cmd.ExecuteReader();
                        sqlConnection1.Close();
                        //            MessageBox.Show("End");

                    }

                    Dts.TaskResult = (int)ScriptResults.Success;
                }
            }
        }
    }
}

Manually Deploy SSRS Reports to SharePoint

I have a situation where there is an alternate authentication method in place on SharePoint and deploying reports using the Visual Studio deployment options won’t work.  To get around this while they sort it out I have manually loaded the reports, data sources and shared datasets to SharePoint.  There were a few tricks which I would like to remember so I’ll post them here.

1. Create 3 document libraries:

The first thing I did was create three libraries, one for Reports, one for Shared Datasets and one for Shared Data Sources.  You don’t have to have separate libraries, but I find it more user friendly to keep these items separate.  I don’t want users weeding through data sets and data sources to get to their reports.  Here is how to create these libraries.  The one surprise is to use a content type of Report Builder Report for the Shared Datasets.  I imagine this is to allow you to configure your Dataset to connect to a Data Source.

2. Create (don’t upload) the Data Source.

Navigate to the Data Source library you created. From the Documents tab select New Document.  Do not try to upload a data source you have already created for your report, since, for whatever reason, SharePoint won’t recognize it as a Report Data Source. You need to recreate it.  

image

Configure the data source appropriately. Choose “Stored Credentials” to allow for proxy authentication, and select “Use as Windows credentials”.  Click on the Test Connection button to be sure it is working.  Click OK.

image

3. Upload the Shared Datasets:

Navigate to your Shared Datasets library and from the Documents tab you can “Upload Document” or  “Upload Multiple Documents” depending on how many shared datasets you have. 

image

4. Connect the Shared Datasets to the Data Source:

Connect the shared datasets to the appropriate data source.  Click the drop down beside the dataset and select “Manage Data Sources”.

image

Click on the “DataSetDataSource”, which will have the yellow caution triangle to let you know it has not been configured.

image

Click on the ellipsis and navigate to wherever you created the data source in SharePoint. 

image

Click OK and click Close.  Do this for all the Shared Datasets you uploaded.

5. Upload the Report:

Navigate to the Report library you created.  From the Documents tab select Upload Document and upload your Report Services report.

6. Connect the Report to the Data Source:

From the drop down beside the report select “Manage Data Sources”.

image

Same as step 4, click on the name of the data source that needs to be connected.  Click on the ellipsis and navigate to where the data source is stored in SharePoint.  Click OK. Click Close.

7. Connect the Report to the Shared Datasets:

From the drop down beside the report select “Manage Shared Datasets”

image

From the list of dataset names which need to connected, click on the first one which has a yellow caution triangle beside it.  This lets you know that the dataset has not yet been connected. 

image

Click on the ellipsis and navigate to where you have stored your shared datasets.  Select the dataset.  Click OK. Repeat this for any shared datasets which have not been connected.  Click Close.

You are ready to view your report.  If you get any data source errors, check that the Shared Datasets are all connected correctly to the data source, as well as the report.

Create a SharePoint SSRS Report Library

For whatever reason this type of library is not out-of-the-box.  I have to set it up manually every time.  Here are the steps for this particular client.  They will be similar for other SharePoint/SSRS set ups.  You can follow these instructions to set up an SSRS Data Source library and an SSRS Share DataSet library.

Document type                        Content Type

Report Services Report       Report Builder Report

Data Source                              Report Data Source

Shared DataSet                       Report Builder Report

1. Create a Document Library in SharePoint.

Go to Libraries.  Click Create.  Call your new library “Reports”.

image

2. Allow Management of Content Types.

Click on your library. Go to Library Settings. Click on Advanced Settings.  Change the radio button for “Allow management of content types” to Yes.  Click OK.

3. Add Report Content type.

In the Library Setting under Content Types click on “Add from existing site content types”.  In this case the client is using Report Builder content types for reporting, which will work fine for Report Services reports.


image

From the “Select site content types from” drop down, select “Report Server Content Types”.  Add any content types you would like to maintain in your Reports library.  I prefer to keep data sources and data sets in separate libraries, but some people like to keep them on one library.  Take note that whichever content type floats to the top of your Content Type list will be the Default content type for your library.  This will matter when creating and adding new documents.  Add the default Content Type first, and then any others.  Click OK.

If you don’t see the Report Server Content Types listed in the drop down, you may need to activate them on your Site Collection.  Read this post to find out how to do that – http://thedataqueenblog.azurewebsites.net/2013/05/activating-ssrs-report-content-types-for-sharepoint/

image


4. Delete the Document Content Type.

Under Content Types select the “Document” content type.

image

Select “Delete this content type”.

image

This will make the Report Builder Report content type the default content type.

You are ready to deploy SSRS reports to your SharePoint library.

If you find that you are unable to deploy your reports using the deploy feature in Visual Studio – for example Visual Studio keeps asking you for credentials when you try to deploy – you may want to manually upload the reports and data sources to SharePoint.  Read this post to find out how http://thedataqueenblog.azurewebsites.net/2012/07/manually-deploy-ssrs-reports-to-sharepoint/

Data-Driven Subscription Fails but Report Runs Manually

In a continuation of my last blog post on Finding Report Subscription Errors, there was a tricky little reason why the subscription was failing for some of the parameter values, even though the reports could all be run manually.  Just like the Current User Filter in SharePoint, it is CASE SENSITIVE.

I got this error in the trace log:

library!WindowsService_113!308!05/29/2012-10:31:17:: e ERROR: Throwing Microsoft.ReportingServices.Diagnostics.Utilities.InvalidReportParameterException: , Microsoft.ReportingServices.Diagnostics.Utilities.InvalidReportParameterException: Default value or value provided for the report parameter ‘Manager’ is not a valid value.;

But all of the values being fed to my subscription were valid values which worked when manually running the report.  Why did some of the reports in the subscription render successfully and others not?  It turns out the underlying query in SSRS for the Manager parameter dropdown had a mix of either lowercase or the first two letters capitalized. The query I was using in my data-driven subscription was all lowercase.  So only those in the report dropdown which were lowercase were running successfully. 

I solved the problem by changing the underlying query feeding the SSRS Report Parameter to lowercase, and ensuring that my subscription query was also lowercase.  This resolved all the errors.

Finding Report Subscription Errors

I had an issue trying to find what was causing a data-driven report subscription error.  The SSRS report is deployed to SharePoint, and Reporting Services is in SharePoint Integrated mode. The subscription was showing last results as “Done: 15 processed of 15 total; 7 errors.” It took awhile to find the pieces I needed to figure out what was causing the error.

I found some information about looking at Report History in SharePoint and creating a New Snapshot, which would give me the last known error.  However, since some of the reports had run successfully this did not work. 

Next I tried looking at the Report Server database in the ExecutionLog tables.  I isolated the query results to just the one report subscription by writing a query like this:

Use ReportServer
select * from ExecutionLog3
where  RequestType = ‘Subscription’ AND timeStart >’2012-05-29 11:30:00.000′
ORDER BY TimeStart DESC

This only returned the successes, not the failures.

Finally, I tried looking in the Report Server Trace Log file.  There was very little in the log file and nothing to do with my subscription.  I knew that the Trace Log file should hold the information I needed.  After much poking around I realized that I had made a fundamental error in my assumption about the architecture. The Trace Log file resides on the SharePoint server, not the Report Services database server. 

Find the Trace Log

The Trace log files can be found on the SharePoint server, usually here:  C:Microsoft SQL ServerMSRS10_50.MSSQLSERVERReporting ServicesLogFiles

Find the ScheduleID for your Subscription

Find the Schedule ID of the most recent subscription by querying the ReportServer database:

select
‘SubnDesc’ = s.Description,
‘SubnOwner’ = us.UserName,
‘LastStatus’ = s.LastStatus,
‘LastRun’ = s.LastRunTime,
‘ReportPath’ = c.Path,
‘ReportModifiedBy’ = uc.UserName,
‘ScheduleId’ = rs.ScheduleId,
‘SubscriptionId’ = s.SubscriptionID
from ReportServer.dbo.Subscriptions s
join ReportServer.dbo.Catalog c on c.ItemID = s.Report_OID
join ReportServer.dbo.ReportSchedule rs on rs.SubscriptionID = s.SubscriptionID
join ReportServer.dbo.Users uc on uc.UserID = c.ModifiedByID
join ReportServer.dbo.Users us on us.UserID = s.OwnerId

Search for the ScheduleID in your Trace Log and find the Error message

Open the appropriate log file based on the time stamp being the most recent after the subscription ran, and search for the ScheduleID.  Once you find the first entry for your ScheduleID, look for anything that starts with e ERROR

The error message can look like this:

library!WindowsService_113!308!05/29/2012-10:31:17:: e ERROR: Throwing Microsoft.ReportingServices.Diagnostics.Utilities.InvalidReportParameterException: , Microsoft.ReportingServices.Diagnostics.Utilities.InvalidReportParameterException: Default value or value provided for the report parameter ‘Manager’ is not a valid value.;

Credits

In preparing this post, I found the following articles to be useful:

http://blogs.msdn.com/b/deanka/archive/2010/02/16/troubleshooting-subscriptions-part-ii-using-the-report-services-trace-log-file.aspx

How to Use a Current User Filter to filter an SSRS Report Web part in SharePoint (using a list of Available Values)

It is not an uncommon requirement to be able to publish an SSRS report to SharePoint and then use it in a Web part filtered by the user viewing it.  You include the domainuserid in your main report query and filter the query on this value using a report parameter where the user value can by typed in.

However, in many cases the report does double duty as a report stored in a Report library, where users could choose multiple or ALL users.  In that case you want to have a list of Available Values in your parameter so that someone viewing the report in the library can pick from a list of users rather than have to know everyone’s user id.  The tricky part is formatting the domainuserid in your parameter so SharePoint can use it, and adding yourself to the list of available values so you can test that the Web part works as expected.

These are easy to do, but it took me a little bit of time to figure it out, so I’m blogging it here.

CREATE THE LIST OF AVAILABLE VALUES FOR YOUR PARAMETER

The SharePoint Current User Filter expects the domainuserid in the parameter list of available values to be all lowercase.  So when creating the SQL Query for  need to convert them to lower case.  You also want to add yourself to the list for testing purposes, otherwise you will get an error when looking at the Web part in SharePoint.  You can do this using a UNION clause.  Your query for the list of available values should look like this:

SELECT DISTINCT
‘mydomain’ + LOWER(myuserid) AS UserAccount,
myUserName as UserName
FROM myTable

UNION
SELECT
‘ ALL’ AS UserAccount,
‘ ALL’ AS UserName

UNION
SELECT
‘mydomainmydevuserid’ AS UserAccount,
‘mydevusername’ AS UserName

I won’t go into the details here of how to use ALL in your report, but you can read more here http://thedataqueenblog.azurewebsites.net/2011/06/how-to-default-to-all-in-an-ssrs-multi-select-parameter/

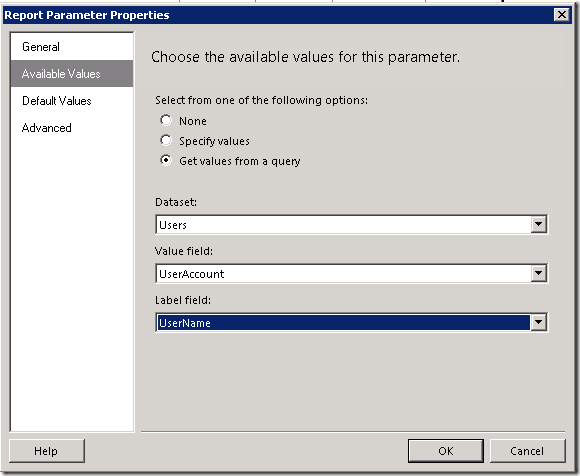
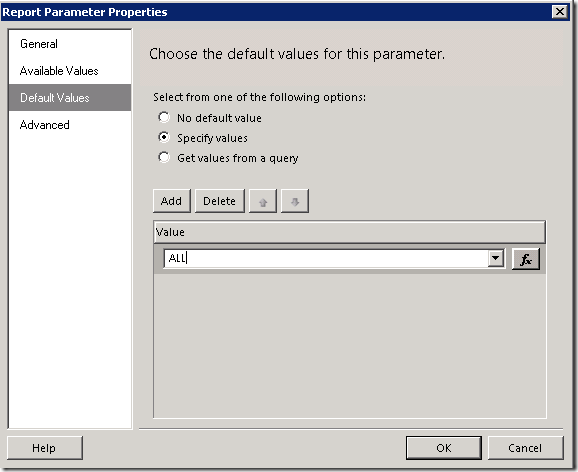
Configure your user parameter as follows:

image

image

image

Publish your report to the relevant SharePoint library, and navigate to the library and test that the report and the parameter is working as expected.

ADD THE REPORT TO A WEB PART

Add the report to a web part as you normally would.  You would add a web page, and configure a web part to be a SQL Server Reporting Services Report Viewer.  Edit the web part and navigate to the report you created.  Open the Parameters section and click on the Load Parameters button.  You can leave the parameter default as “Use Report Default Value”.  Click Apply and OK.

ADD THE CURRENT USER FILTER TO A WEB PART

Add a web part and choose the Current User Filter type from the Filters section.  It will say that it is not connected.

CONNECT THE FILTER TO THE SSRS REPORT VIEWER

Go back to your Report Viewer web part and from the drop down choose Connections –> Get Report Parameters From –> Current User Filter

image

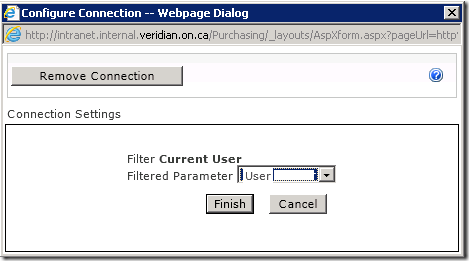
A dialog box will pop up where you can choose your User parameter and click on Finish.

image

Check in your changes and view the results.  You will be able to see your web page with the report filtered on your user name.  As a developer, if you do not have any values in this report you should see the report with no values returned, rather than getting an error.  This is because you added your userid to the list of available values at the beginning of this exercise.  You might want to remove yourself from the list once you have tested that the web part is working correctly.