Manually Deploy SSRS Reports to SharePoint

I have a situation where there is an alternate authentication method in place on SharePoint and deploying reports using the Visual Studio deployment options won’t work.  To get around this while they sort it out I have manually loaded the reports, data sources and shared datasets to SharePoint.  There were a few tricks which I would like to remember so I’ll post them here.

1. Create 3 document libraries:

The first thing I did was create three libraries, one for Reports, one for Shared Datasets and one for Shared Data Sources.  You don’t have to have separate libraries, but I find it more user friendly to keep these items separate.  I don’t want users weeding through data sets and data sources to get to their reports.  Here is how to create these libraries.  The one surprise is to use a content type of Report Builder Report for the Shared Datasets.  I imagine this is to allow you to configure your Dataset to connect to a Data Source.

2. Create (don’t upload) the Data Source.

Navigate to the Data Source library you created. From the Documents tab select New Document.  Do not try to upload a data source you have already created for your report, since, for whatever reason, SharePoint won’t recognize it as a Report Data Source. You need to recreate it.  

image

Configure the data source appropriately. Choose “Stored Credentials” to allow for proxy authentication, and select “Use as Windows credentials”.  Click on the Test Connection button to be sure it is working.  Click OK.

image

3. Upload the Shared Datasets:

Navigate to your Shared Datasets library and from the Documents tab you can “Upload Document” or  “Upload Multiple Documents” depending on how many shared datasets you have. 

image

4. Connect the Shared Datasets to the Data Source:

Connect the shared datasets to the appropriate data source.  Click the drop down beside the dataset and select “Manage Data Sources”.

image

Click on the “DataSetDataSource”, which will have the yellow caution triangle to let you know it has not been configured.

image

Click on the ellipsis and navigate to wherever you created the data source in SharePoint. 

image

Click OK and click Close.  Do this for all the Shared Datasets you uploaded.

5. Upload the Report:

Navigate to the Report library you created.  From the Documents tab select Upload Document and upload your Report Services report.

6. Connect the Report to the Data Source:

From the drop down beside the report select “Manage Data Sources”.

image

Same as step 4, click on the name of the data source that needs to be connected.  Click on the ellipsis and navigate to where the data source is stored in SharePoint.  Click OK. Click Close.

7. Connect the Report to the Shared Datasets:

From the drop down beside the report select “Manage Shared Datasets”

image

From the list of dataset names which need to connected, click on the first one which has a yellow caution triangle beside it.  This lets you know that the dataset has not yet been connected. 

image

Click on the ellipsis and navigate to where you have stored your shared datasets.  Select the dataset.  Click OK. Repeat this for any shared datasets which have not been connected.  Click Close.

You are ready to view your report.  If you get any data source errors, check that the Shared Datasets are all connected correctly to the data source, as well as the report.

Create a SharePoint SSRS Report Library

For whatever reason this type of library is not out-of-the-box.  I have to set it up manually every time.  Here are the steps for this particular client.  They will be similar for other SharePoint/SSRS set ups.  You can follow these instructions to set up an SSRS Data Source library and an SSRS Share DataSet library.

Document type                        Content Type

Report Services Report       Report Builder Report

Data Source                              Report Data Source

Shared DataSet                       Report Builder Report

1. Create a Document Library in SharePoint.

Go to Libraries.  Click Create.  Call your new library “Reports”.

image

2. Allow Management of Content Types.

Click on your library. Go to Library Settings. Click on Advanced Settings.  Change the radio button for “Allow management of content types” to Yes.  Click OK.

3. Add Report Content type.

In the Library Setting under Content Types click on “Add from existing site content types”.  In this case the client is using Report Builder content types for reporting, which will work fine for Report Services reports.


image

From the “Select site content types from” drop down, select “Report Server Content Types”.  Add any content types you would like to maintain in your Reports library.  I prefer to keep data sources and data sets in separate libraries, but some people like to keep them on one library.  Take note that whichever content type floats to the top of your Content Type list will be the Default content type for your library.  This will matter when creating and adding new documents.  Add the default Content Type first, and then any others.  Click OK.

If you don’t see the Report Server Content Types listed in the drop down, you may need to activate them on your Site Collection.  Read this post to find out how to do that – http://thedataqueenblog.azurewebsites.net/2013/05/activating-ssrs-report-content-types-for-sharepoint/

image


4. Delete the Document Content Type.

Under Content Types select the “Document” content type.

image

Select “Delete this content type”.

image

This will make the Report Builder Report content type the default content type.

You are ready to deploy SSRS reports to your SharePoint library.

If you find that you are unable to deploy your reports using the deploy feature in Visual Studio – for example Visual Studio keeps asking you for credentials when you try to deploy – you may want to manually upload the reports and data sources to SharePoint.  Read this post to find out how http://thedataqueenblog.azurewebsites.net/2012/07/manually-deploy-ssrs-reports-to-sharepoint/

SSIS: Connect to PostgreSQL

There is a great blog post on Connecting to a PostgreSQL Instance Using SQL Server Integration Services which you’ll want to read.  I will recap the steps directly from this post:

Installation of both drivers (32-bit & 64-bit) is identical. Here are the basic steps to get the driver working:

  1. Download the latest .msi file for Windows from this location: http://www.postgresql.org/ftp/odbc/versions/msi/
  2. Run the msi file on your SQL Server.
  3. Launch the ODBC Administrator Utility and choose the type of data source you need; File, System or User and click Add.
  4. The ODBC Administrator will present a list of drivers. Scroll to the bottom and you will see two options for PostreSQL; ANSI and Unicode. Select the version you need and click Finish.
  5. The Administrator will present a screen on which you must supply a database name, server name, user name and password.
  6. After you have supplied values for these fields, click the Datasource button and make sure the Use Declare/Fetch box is checked. The driver will fail to retrieve larger datasets if you do not check this box. I have not yet found a satisfactory answer for why this is so.

Now you are ready to build a new connection manager in SSIS and hook it to the PostGRES data source you just created. Use the following settings when building out the connection manager:

  1. Select the .Net ProvidersODBC Data Provider.
  2. Select the “Use connection string” radio button. Using the values you configured in the ODBC Administrator, build a connection string as follows: Dsn=PostgreSQL35W;uid=User1
  3. Enter the User name and Password in the fields provided.
  4. Test the connection and you should be ready to go.


Here are a few bits of information I’d like to add to this excellent blog post, mainly for my own purposes should I run into this again:

I noticed on the PostgreSQL msi page that there were several versions of the drivers.  I took the most recent of the 32bit, psqlodbc_09_01_0100-1.zip.  The 64 bit drivers have “64 bit” in the name.

The 32-bit ODBC drivers for PostgreSQL get installed here C:Program Files (x86)psqlODBC

After installing the 32 bit driver per the instructions, in your Visual Studio solution be sure to change your Project Properties – Debugging – Run64BitRuntime property to False. This will force it to run in 32-bit mode.   

If you are triggering your package from SQL Server Agent, set the SQL Server Agent job to run in 32-bit mode

For SQL2012, be sure to put the password in a Project Parameter so it is retained in the package on deployment to Integration Services, and doesn’t get stripped out due to package protection.

Automate Import of SSIS Packages to File System

A client with SQL Server 2005 asked if there was a good way to import and deploy packages automatically, rather than having to do each package manually every time. This particular client has packages deployed to SQL Server Integration Services. I have written a separate blog post on the Automating Deployment of SSIS Packages in SQL 2005. Here is the solution for importing packages.

BIDS Solution:

Open (or create) the BIDS solution for the related packages which you want to import and deploy. The related packages should all reside in the same folder on Integration Services, otherwise the deployment piece will not work as it can’t deploy to multiple folders. You will need a separate BIDS solution for each SSIS folder, and you will need to create a separate _ImportPackages.dtsx package for each solution.

In order to make this somewhat scalable, the solution folder structures will need to incorporate the exact same folder name as the folder on SSIS, since the SSIS folder name will be used in the import query. For example, if your group of packages is deployed to a folder called “Maintenance” on SSIS, you will want your solution to be called something like “Maintenance ETL”. In this way, once you create your _ImportPackages.dtsx you will be able to copy it to the next solution and simply edit the folder name in the query and the Batch File connection manager. You’ll see what I mean.

Create SSIS Package to Import Deployed Packages:

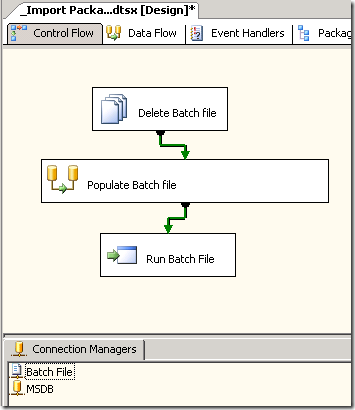
Create a new SSIS package called _ImportPackages.dtsx. I put the underscore in the name so it will float to the top of the SSIS solution when you open it, thereby reminding you to run the package and get the latest copies of the packages deployed to SSIS. The package will look like this:

clip_image001

CREATE CONNECTIONS

DATABASE:

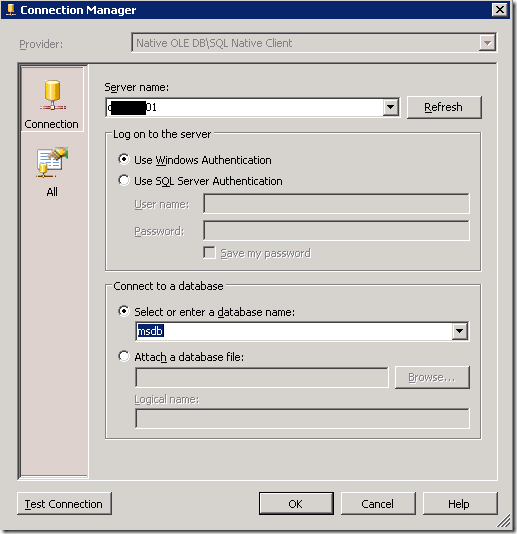
Create a connection to the msdb database on the server where the SSIS packages are being stored.

clip_image002

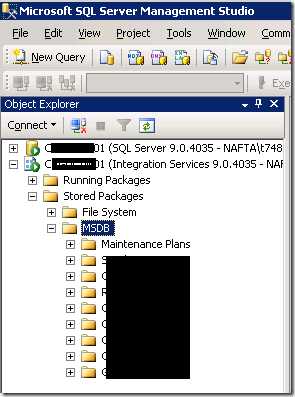
Although the packages are deployed out to Integration Services

clip_image003

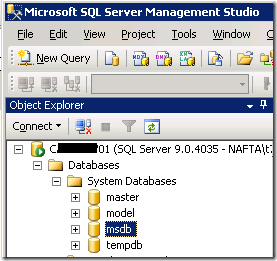
They are actually stored in the MSDB database, which is what you will write your source query against.

clip_image004


BATCH FILE:

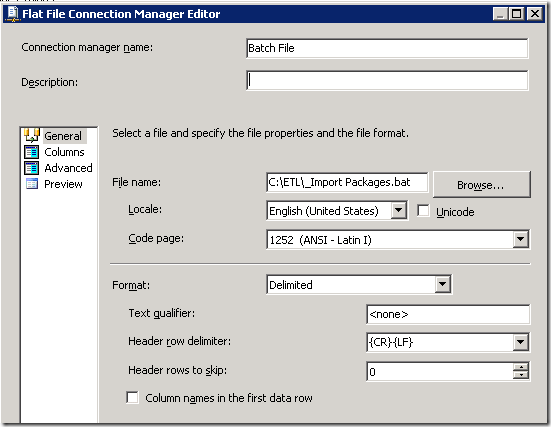
Create a Flat File Connection Manager called “Batch File”. Create a flat file called “_Import Packages.bat”. It will house the dtutil commands in a .bat file which will import all the dtsx packages from the MSDB. Choose a location within your BIDS SSIS solution folder, since you will have one of these batch files per BIDS SSIS solution.

clip_image005

There is one column called dtutil_command.

clip_image006

The column width is 4000 to accommodate the length of the dtutil command lines.

clip_image007

STEP 1 in the Package: Delete Batch File

Drag a File System task from the Toolbox into your Control Flow. Rename it “Delete Batch File”, and configure it to the operation “Delete file” with a Source Connection to the ”Batch File connection” you created above.

clip_image008

STEP 2 in the Package – Populate Batch File

Drag a Data Flow task from the Toolbox into the Control Flow surface. Rename it to Populate Batch File. Connect the “Delete Batch File” task to the “Populate Batch File” task on success. Move to the Data Flow tab and drag an OLE DB Source on the Data Flow surface. Configure it as follows:

clip_image009

Here is that Query again, so you can cut and paste it:

select
CAST(
‘dtutil /SQL "’
+ case
when len(FolderName) = 0 then ”
else FolderName + ”
end
+ [name]
+ ‘" /ENCRYPT FILE;"C:BI ProjectsETL’
+ case
when len(FolderName) = 0 then ”
else FolderName + ‘ ETL’ + FolderName + ‘ ETL’
end
+ [name]
+ ‘.dtsx";1’
+ ‘ /QUIET’ –suppresses prompt to delete if an older file with same name exists )
as nvarchar(4000))
as dtutil_command
from msdb.dbo.sysdtspackages90 pkg
join msdb.dbo.sysdtspackagefolders90 fld
on pkg.folderid = fld.folderid
WHERE foldername = ‘Maintenance’ —CHANGE VARIABLE
order by FolderName, [name]


The results of this query will look like this:

dtutil /SQL "MaintenancePackage1" /ENCRYPT FILE;"C:BI ProjectsETLMaintenance ETLMaintenance ETLPackage1.dtsx";1 /QUIET
dtutil /SQL "MaintenancePackage2" /ENCRYPT FILE;"C:BI ProjectsETLMaintenance ETLMaintenance ETLPackage2.dtsx";1 /QUIET

Notice that the folder name from SSIS is also used in the folder structure on the file system. You will need to adjust the query to suit your naming convention for your BIDS solutions.

Drag a Flat File Destination onto your Data Flow tab and connect the OLE DB source to the Flat File destination. Configure the Flat File destination to the Batch File connection.

clip_image010

Step 3 in the Package: Run Batch file

Drag and Execute Process task from the Toolbox onto the Control Flow tab. Connect the “Populate Batch File” task to the “Run Batch File” task on success. Configure the Executable on the Process tab by navigating to the _Import Packages.bat you created earlier.

clip_image011

Now you can run the SSIS package you just created. It will import all the packages in the specified SSIS folder into the solution folder you specified in the SQL Query.

***Please note that this will not add any new packages to your BIDS solution. It will only refresh existing packages with any deployed changes. You will still need to add the packages within the BIDS solution to the SSIS Packages folder even though they are sitting in the file system. You don’t want to simply ‘Add Existing Package’ either, as you will end up with a duplicate file in your BIDS directory.  I’ve blogged a simple way to Add Multiple Packages to a BIDS solution

Automate Deployment of SSIS Packages on SQL 2005

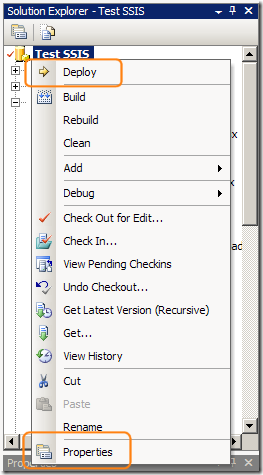
After much playing with SSIS packages I worked out how to Automate Import of Packages to File System using SQL to write out a dtutil batch file.  Then I worked on how to deploy packages back out to the SQL store from the file system. I imagine it might have been accomplished in a similar fashion as the import using a For Each File loop.  Instead I came across a very simple solution for deploying packages to the SQL Store. There is a free CODEPLEX download called BIDS Helper. It doesn’t even require an install,  It’s just an Add In for Visual Studio.

Simply download the appropriate zip file version from here and unpack it into your My DocumentsVisual Studio <version>Addins folder. Close and reopen BIDS and the deploy functionality is there.

clip_image001

More detailed instructions on using it are here.

**Please note, if you have passwords embedded in your packages and want the ability to automatically deploy while maintaining the correct protection level you might want to use Package Configurations to maintain the passwords.  In this way the passwords won’t get stripped from the package on deployment since they will be stored in SQL Server or elsewhere.

Add Multiple Packages to BIDS Solution

A very simple way to add multiple new packages to a solution is to place them in a temporary folder other than the solution folder (otherwise they will be duplicated), and then in Windows Explorer to multi-select them, copy them then navigate to the SSIS Packages folder in your BIDS solution paste them.

If you used the package created in the Automate Import of SSIS Packages to File System post, then first move the packages out of the solution folder into another folder. I will temporarily move them into one folder upwards. C:BI ProjectsETLMaintenance ETL

clip_image001

Now multi-select the packages you have moved and Copy them (CTRL+C – or- right click Copy).

clip_image002

Navigate to your BIDS solution and select the SSIS Packages folder. Paste the packages. (CTRL+V – or- right click Paste)

clip_image003

The packages are now part of the solution.

clip_image004

They have also been added to the solution folder.

clip_image005

Don’t forget to delete the packages from your temporary folder once they have been successfully added to your solution.