CodePlex has a great new toolbox item for SSIS projects in Visual Studio 2012. It’s called the SSIS Excel Refresh Task. It allows you to refresh a whole Excel file or single queries of your Excel sheet. It works for PowerPivot models as well.
There isn’t a lot of instruction on how to install or use it, so I will blog it here.
INSTALLATION
- Close Visual Studio 2012
- Install the SSDT Business Intelligence project templates for Visual Studio 2012 if you don’t already have them. http://www.microsoft.com/en-us/download/details.aspx?id=36843 This will allow you to create an SSIS project.
- Download the SSIS Excel Refresh task from here https://ssisexcelrefresh.codeplex.com/
- Open Visual Studio 2012 and create an Integration Services project and create a package.
- You won’t see the new SSIS Excel Refresh Task in the toolbox the first time. You have to right click inside the SSIS toolbox and select Refresh Toolbox. The task will appear in the Common section of the toolbox.
PREPARING YOUR EXCEL WORKBOOK CONNECTION FOR AUTO REFRESH
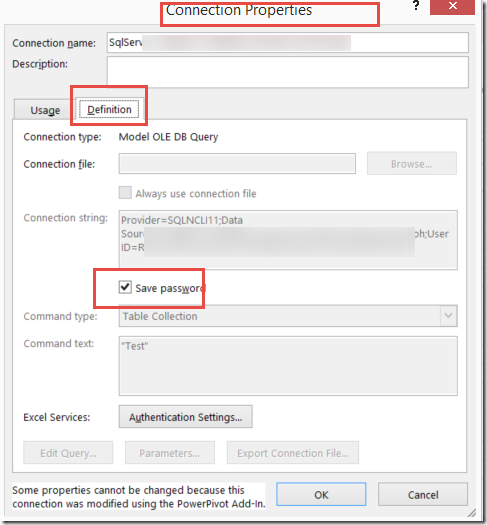
If you are using Windows Authentication in your Excel Data Connection, then you need to ensure that the user driving the SSIS update will authenticate to your data source. If you are using SQL Authentication, then you need to set the password to be saved, so that SSIS won’t get a nasty message box looking for the password. This means that anyone opening the Excel file will have access to the data and to the password, since the password is stored without encryption in the workbook.
- In the Data tab, select Connections.
- Open up the properties for each connection which will be refreshed automatically by the refresh task.
- Click on the Defintion tab and check the Save Password check box
USING THE TASK
- Drag a sequence container onto the Control Flow.
- Drag the Refresh Microsoft Excel Task into the sequence container
3. MAKE SURE the Excel file you want to refresh is closed. Check that it is not locked by another user, otherwise the next step will hang. Test this by opening and closing the file before continuing.
4. Double click on the Refresh Microsoft Excel Task to edit the properties. Click the NEW button to create a connection to your Excel file.
5. Once you create the connection, there is a short wait while the component finds the OLEDB Connections. From here you can do one of two things:
a) You can refresh ALL of the connections in the workbook
or b) You can refresh specific connections in the workbook
6. The component isn’t notified when the update process is finished, so a timeout needs to be manually defined, or dynamically based on the file size. To have it dynamically defined select the Dynamic Timeout Calculation. This is the best option for growing files. Be aware that the calculation is not guaranteed, and refresh may still not be complete after the timeout. You’ll want to be aware of this and keep an eye on it.
7. You need to set the IgnoreTimeoutWarning explicitly to turn off the warning on the task. This is to remind you of the risk of incomplete updates due to the timeout issue described above.
8. Selecting ‘Create a backup before refreshing will create a copy of your spreadsheet in the same folder where the spreadsheet is, and on successful update it will delete the copy.
The tricky bit is, you don’t get an error message if the update is not successful, due to a timeout or some other reason.
That’s all there is to it. Simple and effective. As evidenced by an internet search on this task, it is much easier than writing custom VB scripts to do this for you.


