How to Migrate from SQL 2005 to 2014

On April 12, 2016 Microsoft will no longer offer extended support for SQL Server 2005.  This means no more security updates or hotfixes.  However, the bigger reason to upgrade is the fantastic performance improvements offered in SQL 2014.  SQL Server 2014 has been shown to be 13X faster than 2005, and that is before taking advantage of the in-memory OLTP.  In addition there are features such as AlwaysOn availability groups, updateable columnstore indexes, T-SQL Intellisense and backups directly to the cloud, just to name a few.  For a more complete listing read What’s New in SQL Server 2014 since SQL Server 2005.

Preparation is key.  Microsoft has provided a number of tools to make migrating your databases easier.  You’ll want to use these tools to assess and plan your migration well ahead of time.  Support for Windows Server 2003 is also ending soon, which may impact your decision making.  Part of your assessment will be to ensure your environment is suitable for SQL Server 2014 before migrating your databases. SQL Server 2014, of course, has minimum hardware and software requirements.   Microsoft recommends a minimum of 4GB of memory, to be increased as database size increases, and processor speed of 2.0GHz or faster. The OS depends on which version of SQL Server you are installing. 

There are two ways to migrate from SQL Server 2005 to SQL Server 2014.  You can do a clean install and restore from backup, or you can do an in-place upgrade. The clean install may sound appealing from a Windows registry and system stability standpoint.  However it means restoring all of your databases, and any custom settings and properties you may have changed.  Over 10 years a lot of tweaks to settings can have been made, and it could be very time consuming to restore them all.  It may even mean purchasing another OS license.

You can do an in-place upgrade to SQL Server 2014 from any version as far back as SQL Server 2005.  You cannot do the in-place upgrade for versions prior to that.  You would need to upgrade a prior version to 2005 or 2008 and then upgrade again to 2014. You do need to consider the edition you are upgrading from, Standard, Developer, Enterprise, etc to determine the supported upgrade path.  With the SQL Server 2014 in-place upgrade you will be able to upgrade SSIS packages, SSAS and SSRS.

I highly recommend you install and run the Upgrade Advisor prior to doing the in-place upgrade.  This tool will analyze components of your previous version and identify issues you may need to address before upgrading to SQL Server 2014.  Upgrade Advisor can be installed remotely to analyze all supported components of SQL Server, except SSRS. The remote computer where you are installing Upgrade Advisor must meet the Upgrade Advisor prerequisites.  If you want to analyze SSRS you must install Upgrade Advisor on the report server itself.

You can install the Upgrade Advisor from the the SQL Server setup, or download it from Microsoft. 

image

In addition to the Upgrade Advisor, I found this great resource, Upgrading to SQL Server 2014: A Dozen Things to Check, written by Thomas LaRock. It is not specific to migrating from SQL Server 2005, but it has some great tips for preparing for a smooth SQL upgrade.

Once you have addressed any pre-installation issues, you are ready to perform the upgrade.  I won’t run through the step-by-step as there are many articles documenting this, such as this one.

There are many great reasons to upgrade your SQL Server, and with the end of extended support in sight, now seems like a good time.  Preparation for your upgrade is key, and Microsoft has provided lots of tools to make it easier.

Moving Your SQL Databases to Azure – Things to Know

This blog is original content written for the Microsoft MVP Award Program Blog, posted here.

SQL Azure is a compelling platform for data storage. It’s cheap, reliable, and highly accessible. However, it’s not identical to SQL Server on-premise, and there are a number of things to be aware of when considering a move from one platform to the other, or simply adopting it. This article will walk through what the various SQL Azure options are, outline the processes involved in moving data form on-prem to Azure, and call out some "gotchas", or things to be aware of when operating a SQL Azure database.

COMPARISON WITH ON-PREM

Azure SQL is SQL Server behind the scenes, so most of the functionality is already there including tables, views, stored procedures, triggers, functions, primary and foreign keys and clustered indexes. Of course there is no windows authentication, and it currently uses SQL authentication only.

SQL Azure allows for logical vs physical administration. There is no to need maintain, balance, upgrade or patch the server as this is all done by Microsoft. You have no control over the physical database and log files and cannot get to them. Therefore, you cannot detach and attach databases as you cannot get to the physical drives. You also can’t reboot the server, so if you end up with a runaway query you may have to open a support ticket. Killing the session doesn’t always work.

Most tools work with SQL Azure database, including:

· .NET Framework via ADO.NETC / C++ via ODBC

· Java via Microsoft JDBC provider

· PHP vis Microsoft PHP provider

· Frameworks such as OData, Entity Framework WCF Data Services, NHibernate

Your application talks to the primary database, but there are actually 3 copies kept in sync. There are always 3 copies of the database for high availability during disaster recovery. If your database should go down, one of the secondary copies will be promoted to be the primary database, and new third copy will be created.

There is a requirement for tables in a SQL Azure database to have a clustered index. This is necessary to keep the 3 copies of the database in sync.

The maximum SQL Azure database size is currently 500GB, but you can get around this using SQL federations and partitioning your data across multiple nodes.

There are a number of partially supported and unsupported features. A few of the ones I run into regularly are:

· You cannot use the USE [databasename] sql statement. You must physically switch between databases in your application.

· Remove from indexes – NOT FOR REPLICATION

· Remove from your tables – WITH (PAD_INDEX = OFF, STATISTICS_NORECOMPUTE = OFF, IGNORE_DUP_KEY = OFF, ALLOW_ROW_LOCKS = ON, ALLOW_PAGE_LOCKS = ON) ON [PRIMARY]

You can review a full list of unsupported features here: https://azure.microsoft.com/en-us/documentation/articles/sql-database-transact-sql-information/

TOOLS

SQL Azure database does use transact SQL. There are a number of ways to connect to the database, including Windows Azure Management Portal, SSMS (2008 R2 or newer), or command line utilities such as SQLCMD and BCP. You can move data to and from your SQL Azure database using anything that can connect to the database, such as SSIS, SSMS. When it comes to migrating your database to SQL Azure there is a great article on what to consider, here: https://azure.microsoft.com/en-us/documentation/articles/sql-database-cloud-migrate/

When I migrate a database from SQL to SQL Azure, I typically follow this process using SSMS:

· Create a blank database on the SQL Azure database server

· Generate the scripts from the original database to create the database objects, excluding users

· Do a find and replace to remove any unsupported features such as the two mentioned above

· Run the create database object scripts against the new SQL Azure database

· Create the users and apply permissions for the new database

· Use SSMS or SSIS to copy the data over to the new database.

The SQL Database Management Portal is a web based, scaled down version of SSMS. You can create objects, and run queries and execution plans. But there is no GUI interface for some of the security features like creating users and logins. I find that it’s a friendlier experience to create the database server in the portal, and do everything else using SSMS.

BACKUP

SQL Azure databases are protected by an automatic backup system. The length of time the backups are retained depends on what tier you buy – 7 days for Basic, 14 days for Standard and 35 days for Premium. The point-in-time restore is a self-service feature that costs you nothing unless you use it. If you use it, you pay regular rates for the new database that gets restored. You get all of the protection without any additional cost.

SECURITY

You are in complete control the IP specific access to SQL Azure Database, at both the server AND database level. No one has access by default. At the server level you go into the Management Portal and add your IP in order to be able to connect remotely to the database. Or if you prefer a more granular level of security you can add a firewall rule at the database level to allow specific IPs to connect. Yes, every time your IP changes, you have to update your firewall rules.

SERVICE TIERS AND PERFORMANCE LEVELS

There are three tiers, with several levels of performance within them. I will summarize the Microsoft definitions.

· Basic: Best suited for a small size database, supporting typically one single active operation at a given time.

· Standard: The go-to option for most cloud applications, supporting multiple concurrent queries.

· Premium: Designed for high transactional volume, supporting a large number of concurrent users and requiring the highest level of business continuity capabilities.

Within the tiers are various performance levels. The definition of a Performance Level includes something called a Database Throughput Unit (DTU. DTUs provide a way to describe the relative capacity of a performance level of Basic, Standard, and Premium databases. DTUs are based on a blended measure of CPU, memory, reads, and writes. As DTUs increase, the power offered by the performance level increases. For example, a performance level with 5 DTUs has five times more power than a performance level with 1 DTU. There is more involved, such as maximum concurrent requests, logins and sessions, but at a high level these are the performance levels from which you can choose:

clip_image001

You’ll want to monitor and play with the levels to find the optimum for you needs. There is a Monitor tab for each database in the Azure Portal where you can review the performance. You can easily change the performance level on the fly. If you are anticipating heavier use, you can up the performance level for a period of time, and then drop it back down when the heavy use period is over. You only pay for the performance while it was selected.

COSTS

The pricing varies greatly depending on how many databases you have, how long they have been up, how big they are, what performance level you select, etc. Microsoft advertises no upfront cost, no termination fees, pay only for what you use, and pay by the hour.

Costs can range anywhere from $7 per month for the Basic tier, $19 – $183 per month for a 250GB database in the Standard tier, to $566 to $8500 per month in the Premium tier.

HOW TO PROVISION A SQL AZURE DATABASE

Create a Windows Azure Platform account

If you don’t already have one, you’ll need to create a Windows Azure Platform account. There is a one month free trial on offer. This will give you access to all the Azure services including VMs, SQL databases, websites, AD, etc. To sign up go to http://azure.microsoft.com/. Sign in to the Microsoft Azure Portal at https://manage.windowsazure.com.

Create a Database Server

When you are ready to create a SQL Azure database, you must first add a server to your subscription on which the database will reside in the cloud. Azure will provision it to the least busy server available in the cloud. Health of physical servers are monitored and maintained by Microsoft. You don’t manage these servers yourself. Microsoft does this for you. You don’t need to wait for I.T. to provision a server for you, which could take weeks. Simply sign in, create a server and the admin login credentials, and start adding databases. You can have a server and databases set up in a matter of minutes. To automate server provisioning you can also use PowerShell or REST API calls directly.

Below is an image of the Microsoft Azure Portal. Notice that we are looking at the SQL Databases, Servers tab. You can add a new server by clicking the add button at the bottom of the screen.

clip_image003

· Log in to Windows Azure Management Portal.

· Create a SQL database server.

· Create admin login credentials for that server. This will be used like the SA account.

· Choose the subscription to which you want to add the server, and choose region of the data center where you would like the server to reside.

· You do not get to choose the name of the server. It’s randomly generated.

· Decide if you will "Allow Windows Azure Services", the default is yes. If you were to create a Windows Azure website or cloud service, then services would have access to SQL Azure database server and databases. You can edit this setting the server Configure tab if you change your mind later.

· Click OK. The server will be created in a matter of seconds.

Add Firewall Rules at Server Level

Once you have created the server, you will grab the name of the server, and will likely want to connect to it using SSMS or some other tool. You will connect using the url yourservername.database.windows.net. Your connection will fail, until you add your IP address to the firewall rules.

To add firewall rules and enable service access:

· Click on the database server you created.

· Select the Configure tab.

· You will see your current IP address near the top of the screen

· Add a rule to allow the IP address range that will be connecting to the database and give it a name.

clip_image005

Now you can connect via automatically generated FQDN (xxx.database.windows.net) which initially contains only the master database.

Create a Database

When you create a new database there a number of settings from which to choose, including Service Tiers and Performance Level.

Note: There is an option to select WEB or BUSINESS edition, but this will be retired in September 2015.

Edition: Web (select 1GB or 5GB) or Business (select 10GB to 150GB)

If you create database in SSMS, it will automatically create a 1GB web edition unless you specify otherwise. To create a database in SSMS you can run this sql script:

CREATE DATABASE <yourdatabasename> (Edition ='Business', Maxsize=150gb)

· Key in your database name

· Choose which subscription you are adding this database to

· Choose the Service Tier

· Choose the Performance Level

· Choose the Collation

· Choose on which database server you want the database to reside

clip_image007

Add Firewall Rules at Database Level:

You can add firewall rules at the database server level or at the database level. You can do this at the database level using the stored procedure sp_set_database_firewall_rule.

Run this SQL command against your database:

EXEC sp_set_database_firewall_rule N'MyRule', '100.100.1.1','100.100.1.1'

To look up existing database firewall rules use this query:

SELECT * FROM sys.database_firewall_rules

There are a number of differences and adjustments you may need to make to move to SQL Azure, from unsupported SQL features to managing firewall security. If these are not an issue for you, there is great opportunity to leverage the ease, scalability and reliability of SQL Azure databases. You pay only for what you use and someone else manages the server maintenance, upgrades and backups. It’s a sweet deal.

Setting up Hyper-V and creating a VM

Until now I’ve been using a service to set up separate environments to connect to my clients.  The multitude of VPN software can mess with my machine so I prefer to keep them separate.  Lately I’ve had a lot of challenges with the service, and some down time along with it.  I’ve been wanting to set up Hyper-V on my machine and this was a good excuse.  Thank you to John White for getting me started and answering my myriad of questions.

Here are the steps to setting up Hyper-V on your machine and creating your first VM.

  • Enable Hyper-V on your machine. Enable virtualization in your BIOS if necessary
  • Ensure that you have an active Hyper-V switch that can connect to external networks. Pin to taskbar
  • Create a new VM in a separate (external disk?) location. Use a new disk, if possible, allocate all space
  • Install Windows 8.1 with Service Pack 1 (64 bit) using ISO file
  • Sign in to the VM using your Windows Live credentials.
  • Disable One Drive replication unless you really want it
  • Install Office and any other software you require

Enable Hyper-V on your machine

In order to set up a virtual machine on your computer you need to enable Hyper-V.  You can do that in the Control Panel->Programs->Programs and Features->Turn Windows features on or off.  You will want to check off both the Hyper-V Management Tools and Hyper-V Platform.

image

If Hyper-V platform is greyed out, you will need to enable virtualization in your BIOS settings.  I have blogged the steps here.  You can go back and enable Hyper-V on your machine if you have not already done so.

Ensure that you have an active Hyper-V switch that can connect to external networks. Pin to taskbar

I’ve set my Hyper-V switch up as a Wired Connection, as that is my set up is currently configured as a landline.  You can create a second switch for wireless in case you need this.  This is the network the VM will use.  Your main machine also becomes a VM.

Search for Hyper-V Manager and open it.  Pin it to your taskbar.

image

Click on your host machine and select Virtual Switch Manager from the Actions pane.

image

If a Virtual Switch doesn’t already exist you’ll want to set one up.  This is what mine looks like.

image

Create a new VM in a separate (external disk?) location. Use a new disk, if possible, allocate all space

Ideally you’ll get an external hard drive(s) for VMs.  Ideally you’ll need 128GB for the VM.  Ideally you’ll want your VM to have at least 4GB of RAM.  Set the start up memory to 4096, and use Dynamic Memory. 

These are the screens you will encounter when you set up a new VM.

image

***Note:  You MUST select Generation 1 if you want to be able to mount an ISO file to install the operating system

image

image

image

image

I will explain how to install the operating system next.  For now select "Install an Operating system later".

image

Install Windows 8.1 with Service Pack 1 (64 bit) using ISO file

Right click on your newly created VM and select Settings.

image

Select the IDE Controller for the DVD drive and mount the ISO file by selecting "Image file" and browsing for it.

image

Right click on the VM in the Virtual Machines window and select Start.  When you see the State change to Running, you can right click on the VM and connect to it.  The installation wizard will start from the DVD drive.  Follow the prompts and install Windows.

When prompted, log in to the VM using your Windows Live credentials.

Set up the VM as a new PC.

image

On the next screen disable One Drive replication, unless you really want it.

Now you can install Office and any other software you require.  You’re all set to go with your first VM!

Enable Hardware Virtualization in Firmware

I ran into this when trying to enable Hyper-V on my machine.  I found that the option for Hyper-V Platform was greyed out so I couldn’t select it.  When I hovered over the message was "Hyper-V Cannot be installed: Virtualization is disabled in the firmware".  In order to make it selectable I had to enable virtualization in my BIOS firmware settings. 

Each computer is different but the steps should be similar.  The virtualization feature is usually called Virtualization Technology, Virtual Machine Extensions, VMX, VT, or something similar.  You can look for it in Advanced, CPU or Security features.  It will depend on your motherboard.

Here is how I enabled the setting on my machine.  To get to the BIOS, I closed all my programs and restarted the computer by going to:

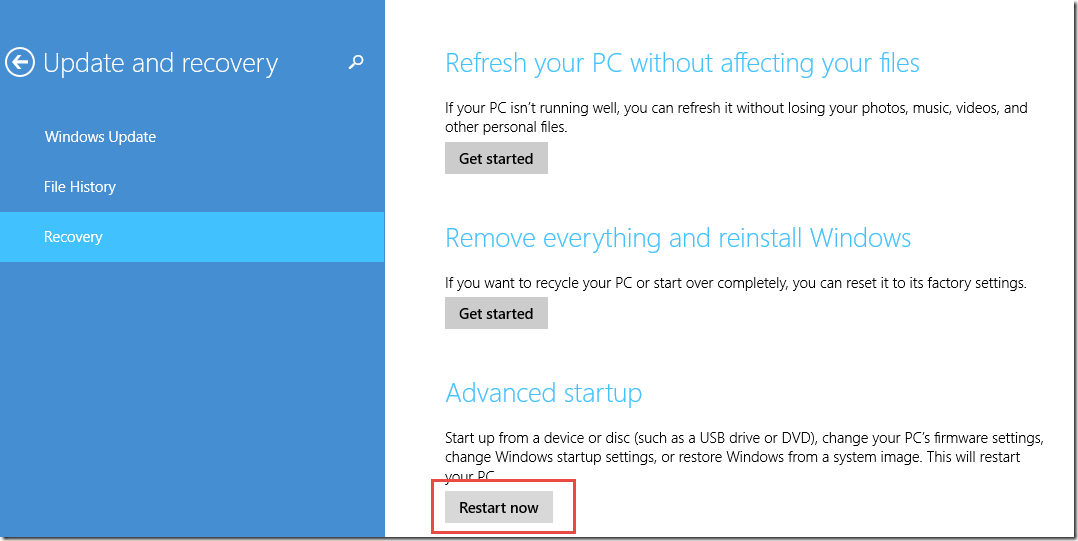
PC Settings -> Update and Recovery -> Recovery -> Restart Now

image_thumb1

When the computer started up again I looked for advanced options.

image_thumb[3]

image_thumb[6]

In the Advanced Options I found the Firmware Settings

image_thumb[7]

I restarted the computer from here in order to bring up and make changes to the Firmware Settings.

image_thumb[9]

On restart, the setup utility came up.  I switched to the Configuration tab, and enabled Intel Virtual Technology, then saved the changes. 

As I mentioned above, the virtualization feature will be different on every machine and is usually called Virtualization Technology, Virtual Machine Extensions, VMX, VT, or something similar.  You can look for it in Advanced, CPU or Security features.  It will depend on your motherboard.

image_thumb[11]

You can now go back and enable Hyper-V on your machine, as it will no longer be greyed out.

Creating a Proxy User to run an SSIS package in SQL Server Agent

There have been a number of times over the years when I have had to create a Proxy user in SQL Server in order to provide needed access to connections and locations being used in an SSIS package.  Sometimes the SQL Server Agent login account simply doesn’t and shouldn’t have the required permissions. 

Before using a Proxy account, do check to see if the permissions issue isn’t just that the SQL Server Agent login account has been set up as ‘Local System’.  If that is the case, see if you can change it to a domain account specifically created for SQL Server Agent purposes.  Check Administrative Tools -> Services on the server where the SSIS SQL Server resides to see what login account the SQL Server Agent is mapped to.

The user mapped to the SQL Server Agent Service Account will need read/write permissions.  If you do need to create a new domain login for the SQL Server agent, in SSMS go to Server-> Security (not database security) -> Logins -> left click New Login -> Search -> Locations button -> Entire Directory -> select main domain ->OK -> Sql Agent username-> Check Names button-> OK-> Server Roles-> sysadmin-> OK..

If it turns out that you need to create an SSIS proxy user, edit this script to use the correct username and password and run it to create the proxy user.

USE master 
GO
-- Create a proxy credential for xp_cmdshell.
EXEC sp_xp_cmdshell_proxy_account 'DOMAIN\username', 'password';--SELECT  * FROM [master].[sys].[credentials]
-- Grant execute permission on xp_cmdshell to the SQL Server login account. 
GRANT exec ON sys.xp_cmdshell TO [DOMAIN\username] 
GO

-- Create a credential containing the domain account PowerDomain\PowerUser and its password
CREATE CREDENTIAL MyCredential WITH IDENTITY = N'DOMAIN\username', SECRET = N'password'
GO
USE [msdb]
GO
-- Create a new proxy called SSISProxy and assign the PowerUser credentail to it
EXEC msdb.dbo.sp_add_proxy @proxy_name=N'MyProxy',@credential_name=N'MyCredential',@enabled=1
-- Grant SSISProxy access to the "SSIS package execution" subsystem
EXEC msdb.dbo.sp_grant_proxy_to_subsystem @proxy_name=N'MyProxy', @subsystem_id=11
-- Grant the login testUser the permissions to use SSISProxy
EXEC msdb.dbo.sp_grant_login_to_proxy @login_name = N'DOMAIN\username', @proxy_name=N'MyProxy'
GO

You will be able to see the proxy user in SSMS under SQL Server Agent.  Is is in the SSIS PAckage Execution section because we added it to the SSIS subsystem in our code.


image

Now when you create your SQL Server Agent Job you can choose to run the SSIS package as your proxy user with the required permissions,rather than the SQL Server Agent account.

image

Promoting Excel Tabular Model to SSAS

PowerPivot for Excel is a fantastic addition to Microsoft’s Business Intelligence offering.  It provides a self-service capability for users to mash-up huge amounts of data from multiple sources, create advanced calculations that get refreshed alongside their pivot tables and the ability to very easily publish workbooks as web applications.  Excel users are already comfortable with the interface.  And the PowerPivot add-in is free for Excel 2010 and 2013 users. 

There are pros and cons to using any one of PowerPivot for Excel, PowerPivot for SharePoint, SSAS Tabular or SSAS multidimensional.  Melissa Coates has written a great article on when to use which type of model. While PowerPivot for Excel is a fairly robust and flexible tool for individual users, there are many reasons why you might promote an Excel Tabular model to SQL Server Analysis Services. 

PowerPivot for Excel can be a great starting point for users to decide what information they want to include in a model. It allows them to play with the data and refine the model until it houses the main information that they need to see on a regular basis, in a format they can easily consume.  What can happen is that the workbooks get emailed around and get out of synch between users.  Or the data gets too large and the model takes forever to refresh.  Or the in-memory calculations take too long to load.

When this happens you might want to promote your Excel Tabular model to SSAS, if your infrastructure supports it.  It means the flexibility for users to mash-up additional data is lost, but the gains in stability, scalability, security and other features can be well worth the move.  Microsoft has made this promotion of a model very easy to do.

1. Create a new SSAS Project

Open up SQL Server Data Tools.  In the File menu click New and then Project.  In the New Project dialog box, under Installed Templates expand Business Intelligence and select Analysis Services.  On the right select Import from PowerPivot.

Browse for a location and enter a name for your project, and then click OK.

image_thumb1

In the Tabular model designer dialog you can enter the SSAS instance you will use for model.  It will need to be an SSAS instance running in Tabular mode.

image_thumb3

In the Open dialog box select the PowerPivot model for Excel that you will be converting to SSAS.

image_thumb5

It will take a minute or two to load the model into the project.

2. Check and refine your model

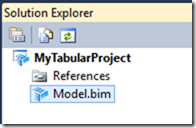
In the solution explorer, double click on the Model.bim top open up the imported model. 

image_thumb6

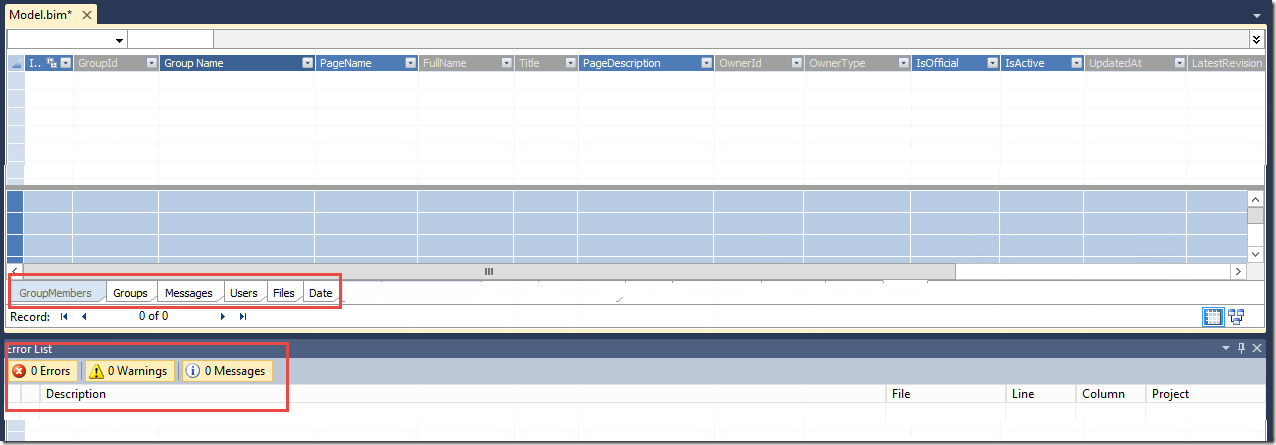
You will see the tabs similar to the PowerPivot model near the bottom of the screen, and any warnings, errors or messages. 

image_thumb8

Here you can do any edits to your model.  The interface is very similar to PowerPivot.  You can delete, hide or show data tabs from Client Tools by right clicking on the tab. 

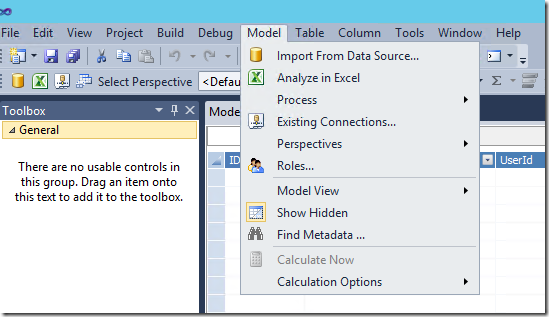
You can manage the model from the Model menu.

image_thumb12

You can edit the table properties and manage the relationships from the Table menu.

image_thumb10

You can add, edit and manage calculations and columns within the table tab.

image_thumb14

3. Deploy the Model to Analysis Services

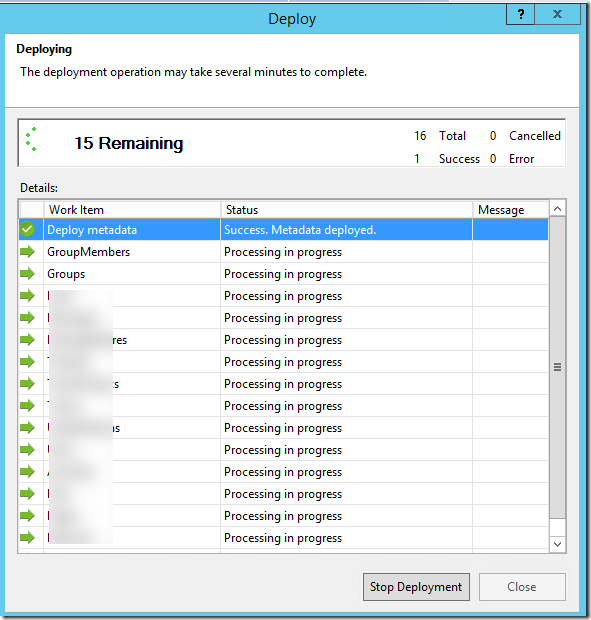
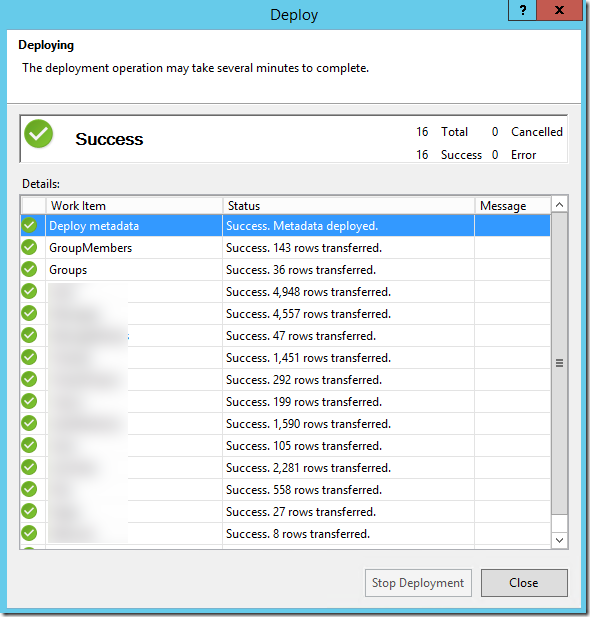
From the Build menu, you can build and deploy your model.  You can troubleshoot any deployment issues by following the error messages that pop up in the Deployment dialog in the Message column.

SNAGHTML103f7068_thumb1

image_thumb16

4.  Connect to your SSAS Tabular Model

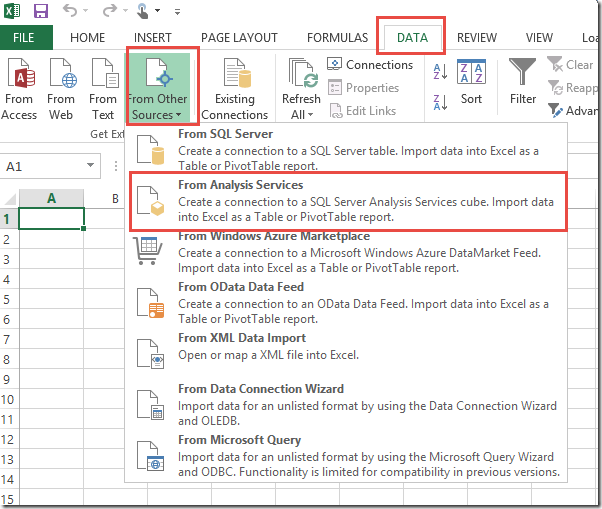
You can connect to the model through Excel or SSMS or any other client tool that can consume an SSAS model.  In Excel, you won’t be using PowerPivot, rather you will be using the SSAS Tabular model as a direct data source.

In Excel, click on the Data tab, click on From Other Sources and then From Analysis Services.

image_thumb22

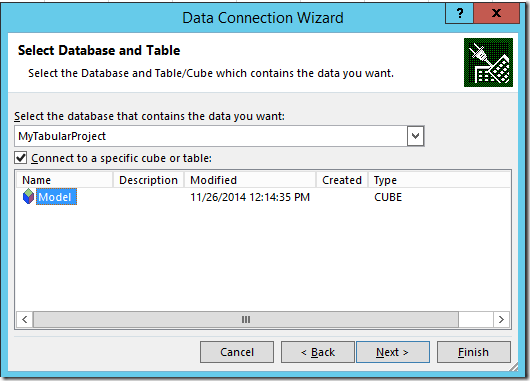
Enter the server name where you deployed your model, then select the database and model that you deployed.

image_thumb24

You can now use this as a classic Pivot Table data source.


I’ve noticed that the Tabular model is not as robust or responsive as the multi-dimensional model when you get to larger sets of data.  This is because it does everything in memory.  The converse of this is also true for smaller sets.  Because it is in-memory it can retrieve information and do calculations more quickly for smaller data sets.  Multi-dimensional models have additional features that Tabular does not have.  Richard Lees did an interesting comparison of Tabular vs Multidimensional.

As mentioned at the beginning of this article, the flexibility of PowerPivot can be exchanged in favour of the stability and scalability of a traditional SSAS deployed model.  Having users develop their own tabular models in PowerPivot and then have I.T. manage and deploy it to a wider audience allows for a great partnership and a quick development cycle.

SSIS Excel Refresh Task

CodePlex has a great new toolbox item for SSIS projects in Visual Studio 2012.  It’s called the SSIS Excel Refresh Task. It allows you to refresh a whole Excel file or single queries of your Excel sheet.  It works for PowerPivot models as well.

There isn’t a lot of instruction on how to install or use it, so I will blog it here. 

INSTALLATION
  1. Close Visual Studio 2012
  2. Install the SSDT Business Intelligence project templates for Visual Studio 2012 if you don’t already have them.  http://www.microsoft.com/en-us/download/details.aspx?id=36843  This will allow you to create an SSIS project.
  3. Download the SSIS Excel Refresh task from here https://ssisexcelrefresh.codeplex.com/
  4. Open Visual Studio 2012 and create an Integration Services project and create a package.
  5. You won’t see the new SSIS Excel Refresh Task in the toolbox the first time.  You have to right click inside the SSIS toolbox and select Refresh Toolbox.  The task will appear in the Common section of the toolbox.

image

PREPARING YOUR EXCEL WORKBOOK CONNECTION FOR AUTO REFRESH

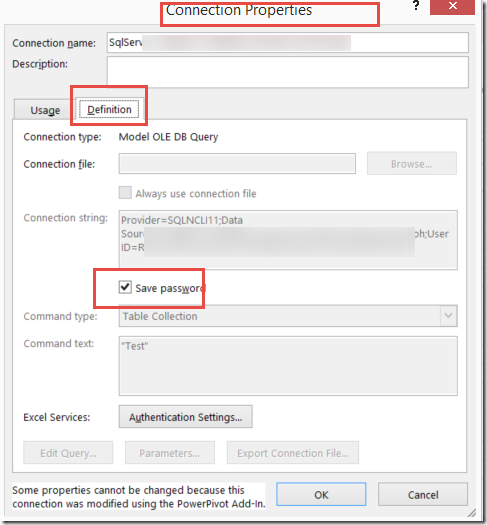
If you are using Windows Authentication in your Excel Data Connection, then you need to ensure that the user driving the SSIS update will authenticate to your data source. If you are using SQL Authentication, then you need to set the password to be saved, so that SSIS won’t get a nasty message box looking for the password.  This means that anyone opening the Excel file will have access to the data and to the password, since the password is stored without encryption in the workbook.

  1. In the Data tab, select Connections.
  2. Open up the properties for each connection which will be refreshed automatically by the refresh task. 
  3. Click on the Defintion tab and check the Save Password check box

SNAGHTML77a40aa0

USING THE TASK
  1. Drag a sequence container onto the Control Flow.
  2. Drag the Refresh Microsoft Excel Task into the sequence container

image

3. MAKE SURE the Excel file you want to refresh is closed.  Check that it is not locked by another user, otherwise the next step will hang.  Test this by opening and closing the file before continuing.

4. Double click on the Refresh Microsoft Excel Task to edit the properties.  Click the NEW button to create a connection to your Excel file.

image


5. Once you create the connection, there is a short wait while the component finds the OLEDB Connections.  From here you can do one of two things: 

a)  You can refresh ALL of the connections in the workbook

image

or b) You can refresh specific connections in the workbook

image

6. The component isn’t notified when the update process is finished, so a timeout needs to be manually defined, or dynamically based on the file size.  To have it dynamically defined select the Dynamic Timeout Calculation. This is the best option for growing files.  Be aware that the calculation is not guaranteed, and refresh may still not be complete after the timeout. You’ll want to be aware of this and keep an eye on it. 

image

7. You need to set the IgnoreTimeoutWarning explicitly to turn off the warning on the task.  This is to remind you of the risk of incomplete updates due to the timeout issue described above.

image

8.  Selecting ‘Create a backup before refreshing will create a copy of your spreadsheet in the same folder where the spreadsheet is, and on successful update it will delete the copy.

image

The tricky bit is, you don’t get an error message if the update is not successful, due to a timeout or some other reason. 

That’s all there is to it.  Simple and effective.  As evidenced by an internet search on this task, it is much easier than writing custom VB scripts to do this for you.

Microsoft MVP Summit

Last month I had the great honour of winning a Microsoft MVP Award.  Most of my friends and family don’t really understand what a big deal it is to win this award.  I was over the moon.  This is an award that Microsoft gives to folks who have contributed their time and energy to help others in the Microsoft community.  There are hundreds of MVPs around the world.  Many of them have been given an MVP every year for many years, in order to acknowledge their continued service to the community and to gain their expertise in evolving the Microsoft tool set.  They have to win it back every year.  No small feat.  I won mine in the SQL Server area of expertise, in part because of this blog that I write. It seems that the solutions I log here are helpful to a lot of people.

This week I am attending the MVP Summit in Seattle. I have found it humbling and exciting to be in the company of such great minds who are dedicated to excellence.  It is energizing to meet with like minded people who are dedicated to finding new and innovative solutions and to serving their customers in the best way possible.  I have enjoyed talking to MVPs and Microsoft employees from around the world who are experts in their fields, and am learning a lot from them.  I find it reassuring to know that there are people out there, a lot of people, who are continually innovating for the betterment of our future.  Some days I get tired, and forget that they’re out there.  I have found renewed energy in being here at the conference.  John Galt is alive and well.

There is one thing about this conference that I find really surprising.  The lack of women.  I know that women haven’t traditionally gravitated to I.T. careers, but I have seen that trend changing over the years.  I attended the SQL Pass conference 2 years ago and saw quite a few women there.  But here at the MVP conference I see only a smattering.  Why is that?  Are they too busy juggling home and work to have the time to pursue additional interests?  I’m very curious.  I would like to see more women pursue and win MVPs.  They can offer an additional perspective.  Technology is quickly becoming pervasive in our homes and workplaces. And there is no denying that, with regard to technology, the Microsoft community has a huge affect on the direction in which our society will go. I think there will be an unbalanced perspective if women do not also contribute their thoughts and communicate their values in shaping this direction. This concerns me deeply.

I head home tomorrow.  It has been a whirlwind of gaining information and connecting with my peers.  I am leaving with the understanding that with this award comes the responsibility of helping Microsoft and its community to evolve and grow.  It may be because I’m a geek, but I find that very exciting.

Check if Stored Procedure is Running

Here is a sweet little script that can check which stored procedures are running and perform an action.  In this case I need to update a configuration table if the stored procedure is not running.

BEGIN
    -- SET NOCOUNT ON added to prevent extra result sets from
    -- interfering with SELECT statements.
    SET NOCOUNT ON;

DECLARE @spName NVARCHAR(MAX)    -- the string we're looking for. The variable to become a parameter if you wish to extend this sp
DECLARE @handle SMALLINT    -- the spid of the process
DECLARE @sql NVARCHAR(MAX)  -- the dynamic SQL
DECLARE @table TABLE ( EventType nvarchar(30) , [Parameters] int , EventInfo nvarchar(4000) )   -- the table variable holding the result of DBCC INPUTBUFFER execution

DECLARE @tblProcs as TABLE (i int identity, spName nvarchar(100),IsRunning BIT) 
DECLARE @i int
SET @i = 1

INSERT INTO @tblProcs (spName, IsRunning) SELECT Name, 0 as IsRunning FROM dbo.sysobjects WHERE (type = 'P')

    DECLARE procs CURSOR FOR SELECT session_id FROM sys.dm_exec_requests WHERE status IN ('running', 'suspended', 'pending', 'runnable') AND session_id <> @@SPID ORDER BY session_id DESC  -- these are the processes to examine

    OPEN procs
    FETCH NEXT FROM procs INTO @handle
    WHILE @@FETCH_STATUS=0 
    BEGIN

WHILE @i <= (Select count(*) from @tblProcs)
BEGIN

SELECT @spName = spName FROM @tblProcs WHERE i=@i

        BEGIN TRY            
            DELETE FROM @table

            SET @sql = 'DBCC INPUTBUFFER(' + CAST(@handle AS NVARCHAR) + ')'
                
            INSERT INTO @table
            EXEC (@sql)

            SELECT @sql = EventInfo FROM @table
        END TRY
        BEGIN CATCH
            SET @sql = ''
        END CATCH
        
        IF CHARINDEX( @spName, @sql, 0 ) > 0
        BEGIN
            UPDATE @tblProcs SET IsRunning = IsRunning + 1 WHERE spName = @spName
        END

SET @i = @i + 1
END

        FETCH NEXT FROM procs INTO @handle
    END
    CLOSE procs DEALLOCATE procs

UPDATE [admin].[ConfigurationsApp] SET [Value] = 'NOT RUNNING' 
FROM [admin].[ConfigurationsApp]
INNER JOIN @tblProcs as p on P.spName = [admin].[ConfigurationsApp].Name
WHERE IsRunning = 0

END

Thanks to John Billiris who provided a good portion of this solution in this post

Querying XML in SQL

I like to use my blog as a library for myself, to be able to easily find solutions I have used before.  Here is a simple example of querying an XML string using SQL. 

In this example I have inserted one XML string into a temporary table, with two items called pages, and two reference of type ‘book’.  The resulting select statements will pull any and all pages from the XML string, and any ‘book’ references.  There can be multiple types of references with varying fields, which you can query in the same way, simply be altering the text in the .nodes in the FROM statement.

    DECLARE @xml as XML
    DECLARE @tblXML AS TABLE  (Response xml )
INSERT INTO @tblXML
SELECT '<response>
  <pages>
    <page>
      <id>1376745</id>
      <name>First Page</name>
     </page>
    <page>
      <id>1376746</id>
      <name>Second Page</name>
     </page>  </pages>
  <references>
    <reference>
      <type>book</type>
      <id>425285</id>
      <name>How I met your mother</name>
      <activestatus>false</activestatus>
    </reference>
    <reference>
      <type>book</type>
      <id>425286</id>
      <name>Covered in Bees</name>
      <activestatus>true</activestatus>
    </reference>
  </references>
</response>' as Response


SELECT @xml = Response from @tblXML

            SELECT 
                ID        =    t.item.value('(id)[1]','int'),
                BookName    =    t.item.value('(name)[1]', 'nvarchar(50)'),
                IsActive    =    case when t.item.value('(activestatus)[1]', 'nvarchar(10)') = 'false' THEN cast(0 as bit) ELSE cast(1 as bit) END
            FROM @xml.nodes('/response/references/reference[type/text() = "book"]') as t(item)


            SELECT ID        =    t.item.value('(id)[1]','int'),
                PageName    =    t.item.value('(name)[1]', 'nvarchar(50)')
            FROM @xml.nodes('/response/pages/page') as t(item)

You can also query a table directly rather than storing the XML in a variable by using CROSS APPLY, like this.

            SELECT ID        =    t.item.value('(id)[1]','int'),
                PageName    =    t.item.value('(name)[1]', 'nvarchar(50)')
            FROM @tblXML x
            CROSS APPLY
            Response.nodes ('/response/pages/page') as t(item)

I hope you find this useful.